
When setting up your Clients in techShip, you will have to configure Billing Accounts to ship through them. These use a Baseline Account as a foundation, but their way to work could be different based on the Client's needs.
When setting Billing Accounts, you will be able to specify how it should work for that specific client, setting label references, packing slips usage, rate shopping, markups, WMS information updating and Carrier options such as the default service level, address validation, sender and return addresses, etc.
 WARNING: This Carrier has Reference value usage requirements. These will be described in the "Set up the General Options" section below.
 WARNING: To use a specific Carrier through eHub, you must set the eHub plugin code that matches the Carrier.
For example, to enable only USPS services through eHub, set the EHUBUSPS plugin code.
If you plan to use multiple carriers through eHub, set the EHUB plugin code instead.
This article describes the procedure to set up via eHub billing account, while others are specifically written for other Carriers.
ADD THE ACCOUNT TO THE CLIENT PROFILE
1. Access Clients under the Maintenance menu

2. Click on the Client for which you wish to set up the billing account
3. Press Add Billing Account
4. Select the source account which will be used and Save
5. Edit the Billing account
SET UP THE GENERAL OPTIONS
The General Options tab is the same for every carrier. If you are already acquainted with it from previous setups, please configure it accordingly.
WARNING: This Carrier requires you send either the Transaction Number or the Customer Order Number as the Order ID, that is the Reference 3 field, noting that:
- Reference 1: Label text reference #1, reference which will be shown in the label
- Reference 2: Label text reference #2, reference which will be shown in the label
- Reference 3: OrderID (select Reference# or Customer Order# from the dropdown, making sure you're passing this information as part of the order data; you can still use the field for other references) 
If this is your first time setup or you aren't acquainted to it, refer to the following article and once finished, return to this one to set up the carrier specific options:
How to configure the Billing Account General Options tab [Step-by-Step guide]
SET UP THE CARRIER OPTIONS
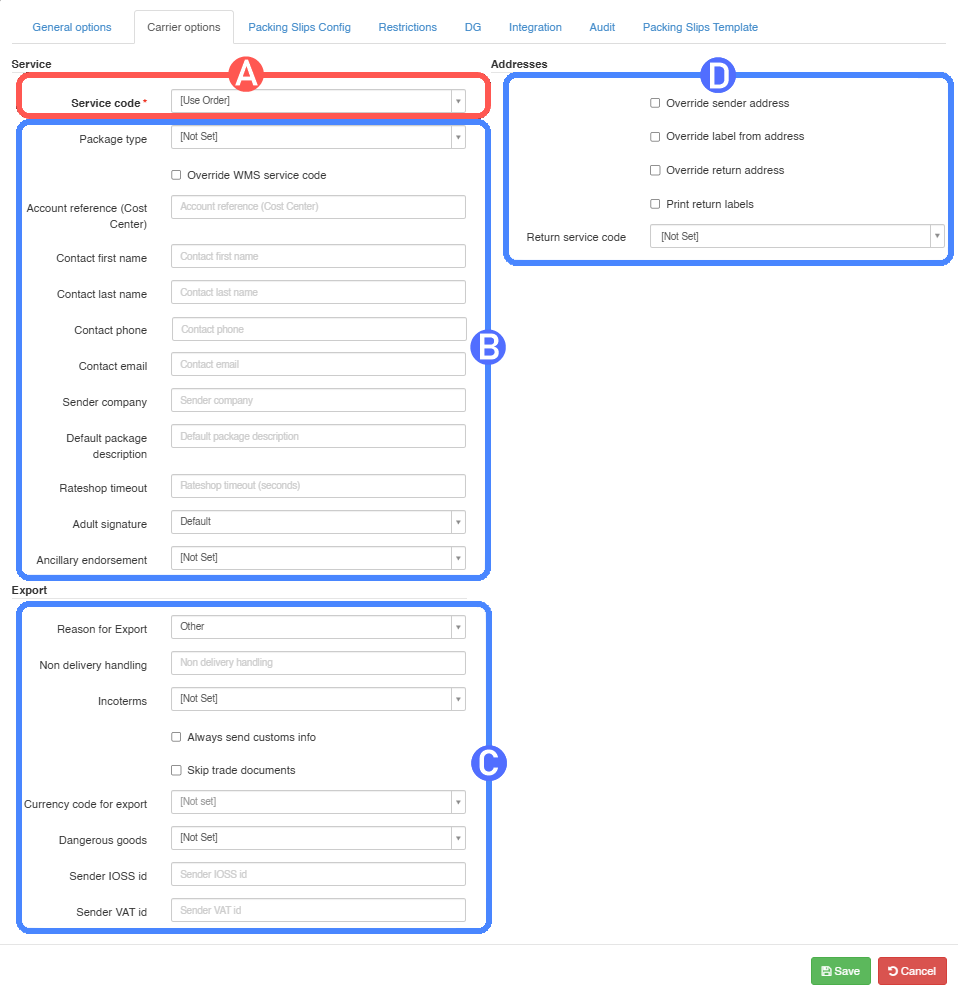
The Carrier Options tab allows to set up basic and advanced features of your eHub billing account.
These are the key elements:
REQUIRED
A) Service code: Choose a service code to assign to imported orders which don’t have a service code, or keep it if they have one. If you wish to overwrite any code coming from the WMS with the chosen service, check Override WMS service code.
You can choose between the service level that comes with the order, ECO mode which grabs the cheapest service, or an arbitrary service level for all cases. You can go in depth on this subject in this article.
OPTIONAL
B) Service options:
- Package type: Allows you to specify which package type you will use. It could be a specific one or a variable value, depending on the case.
- Override WMS service code: If checked, the selected service code will replace the service code received from the WMS.
- Account reference (Cost Center): Define the account reference or cost center when applicable.
- Contact first name: Specify the contact first name for this account.
- Contact last name: Specify the contact last name for this account.
- Contact phone: Specify the phone number associated with this billing account and its handling.
- Contact email: Specify the email associated with this billing account and its handling.
- Sender company: Specify the Sender Company. You can also override the sender address (by default techShip will use the one defined on the source Carrier account) to an address different from the source. To do so, follow the steps from this article.
- Default package description: Define the default package description to use when applicable.
- Rateshop timeout: Define the timeout, in seconds, for rate shopping requests.
- Adult signature: Specify the adult signature option to use, if any.
- Ancillary endorsement: Specify which type you will use, if any.
C) Export fields:
- Reason for Export: Select the reason for export from the dropdown (Sample, Sold, etc.).
- Non delivery handling: Complete with instructions for non delivery handling.
- Incoterms: Select the Incoterms value to use for export shipments.
- Always send customs info: If checked, customs information will be sent with the shipment.
- Skip trade documents: If checked, trade documents will not be generated.
- Currency code for export: Select the currency code to use for export shipments from the dropdown.
- Dangerous goods: When applicable, specify which type of dangerous goods will be used.
- Sender IOSS id: When applicable, enter the sender IOSS identifier to send with international shipments.
- Sender VAT id: When applicable, enter the sender VAT identifier to send with international shipments.
 NOTE: The Sender IOSS id and Sender VAT id fields can also be configured at the order level in Carrier Options when they need to be defined for a specific order. In that view, you can also configure Bill-to IOSS id, Bill-to VAT id, and Consignee VAT.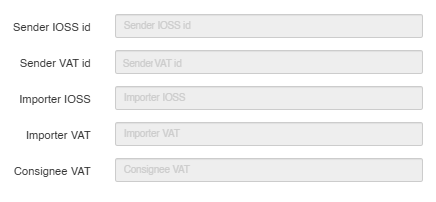
D) Addresses:
- Override sender address: Allows to define an alternative address for induction; This will affect rating, since this address will ignore the one set up in the Baseline account, and use the new provided one.
- Override label from address: Allows to define an alternative address to be shown in labels; This allows to keep the warehouse address undisclosed, while providing another one, typically tied to the Client (company).
- Override return address: Allows to define an alternative return address; This allows to provide the customer with a return address which is different from the warehouse, should returns be routed somewhere else.
- Print return labels: If checked, return labels will be printed when applicable.
- Return service code: Select the return service code to use when return labels are enabled.
NOTE: When using the EHUBUSPS plugin code, this carrier may include a commercial invoice in the shipment response. techSHIP stores it automatically and makes it available for download and print. No additional billing account configuration is required.
Press Save to apply the changes. If the information is valid, you'll be able to process orders through it.
SPECIFYING RATE SHOPPING SERVICE CODES (OPTIONAL)
If you are Rate Shopping with this account, you might want to specify which services you want be taken into consideration or excluded. Read this article to set up your inclusion/exclusion list.
Was this article helpful?
That’s Great!
Thank you for your feedback
Sorry! We couldn't be helpful
Thank you for your feedback
Feedback sent
We appreciate your effort and will try to fix the article