You can upload and manage a CUSMA (Canada-United States-Mexico Agreement) Certificate of Origin directly to an Item in techSHIP.
This feature helps you comply with customs regulations and qualify eligible shipments for duty-free treatment under CUSMA. When a shipment is processed, techSHIP automatically consolidates all unique CUSMA certificates from the items in the order into a single PDF file, which is electronically transmitted to supported carriers.
You can attach a certificate when creating a new item, editing an existing one, or through the item import process.
 NOTE: To verify if a specific Carrier supports this feature, refer to the carrier's documentation as listed in the techSHIP supported Carriers - Master List [Guides List].
To learn more about how to add a certificate via import, see How to Import Items for a Client from an XLSX File [Step-by-Step Guide].
This article is divided into the following sections:
- Attaching a CUSMA Certificate
- Managing a CUSMA Certificate
I. ATTACHING A CUSMA CERTIFICATE
NOTE: In the previous version of techSHIP, the navigation for steps 1 and 2 is clicking Maintenance from the main menu, and then Clients. From step 3 onwards, the process is the same, despite minordifferences in the user interface.
 NOTE: Before proceeding, ensure you are operating the right portal.
1. Click Clients from the left menu under the Clients section to find the desired Client.
2. Click the Settings icon to edit the desired Client.

3. Click Items tab.
4. Press Add Item or Edit next to the desired item according to your case.

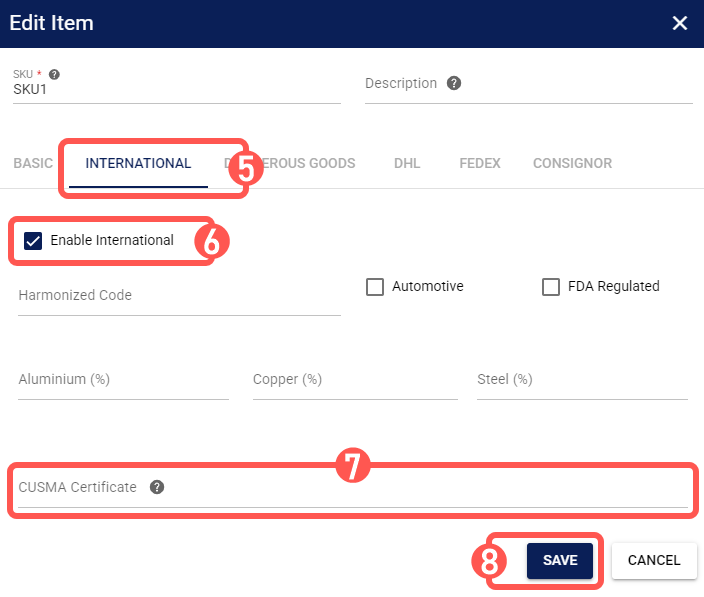
5. Click the International tab.
6. Check Enable International.
This checkbox must be enabled to access the fields on this tab.
NOTE: You will see several fields on this tab related to customs information. These fields are not related to the CUSMA certificate. To learn more about these fields, refer to: Understanding International Item Fields for Customs and Compliance [Information].
7. Click CUSMA Certificate and select the PDF file from your computer.
NOTE: Each item supports only one PDF certificate of up to 10 MB.
8. Press Add Item (if creating) or Save (if editing) to apply the changes.
II. MANAGING A CUSMA CERTIFICATE
Once a certificate is attached, you can manage it from the International tab:
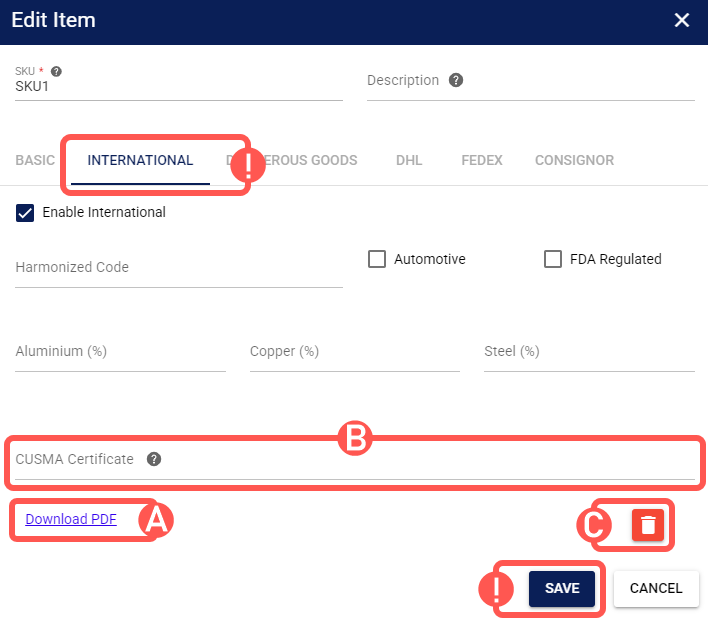
A. Download: Click Download PDF to save a copy of the uploaded certificate.
B. Replace: Click CUSMA Certificate to select a new file. The new certificate will automatically replace the existing one.
C. Delete: Click the trash can icon to remove the certificate from the item.
Once finished, press Save.
To learn more about what you can do next, refer to the Items folder in our knowledge base.
Was this article helpful?
That’s Great!
Thank you for your feedback
Sorry! We couldn't be helpful
Thank you for your feedback
Feedback sent
We appreciate your effort and will try to fix the article