
When setting up your Clients in techShip, you will have to configure Billing Accounts to ship through them. These use a Baseline Account as a foundation, but their way to work could be different based on the Client's needs.
When setting Billing Accounts, you will be able to specify how it should work for that specific client, setting label references, packing slips usage, rate shopping, markups, WMS information updating and Carrier options such as the default service level, address validation, sender and return addresses, etc.
 WARNING: If you are using UPS Mail Innovations, and the packaging option used for it is not compatible with the regular services packaging option, you will have to set up a separate Billing Account profile with a packaging type valid for the service.
This article describes the procedure to set up a UPS billing account, while others are specifically written for other Carriers.
Feel free to follow the step-by-step guide written below or the video guide, as you prefer:
To set up a UPS billing account, define the following and then Save:
ADD THE ACCOUNT TO THE CLIENT PROFILE
1. Access Clients under the Maintenance menu

2. Click on the Client for which you wish to set up the billing account
 NOTE: You can upload the Cusma PDF Certificate to an item. If you do, the order packages matching the SKU will send the Cusma PDF to UPS. To learn more about this option: How to Attach and Manage a CUSMA Certificate of Origin to an Item [Step-by-Step Guide]
 3. Press Add Billing Account
4. Select the source account which will be used and Save
5. Edit the Billing account
SET UP THE GENERAL OPTIONS
The General Options tab is the same for every carrier. If you are already acquainted with it from previous setups, please configure it accordingly.
If this is your first time setup or you aren't acquainted to it, refer to the following article and once finished, return to this one to set up the carrier specific options:
How to configure the Billing Account General Options tab [Step-by-Step guide]
SET UP THE CARRIER OPTIONS
The Carrier Options tab allows to set up basic and advanced features of your UPS billing account.
NOTE: For a FULL detail on the available fields in this section, check the following article: UPS Small Parcel Billing Account field details [Information]These are the key elements:
REQUIRED
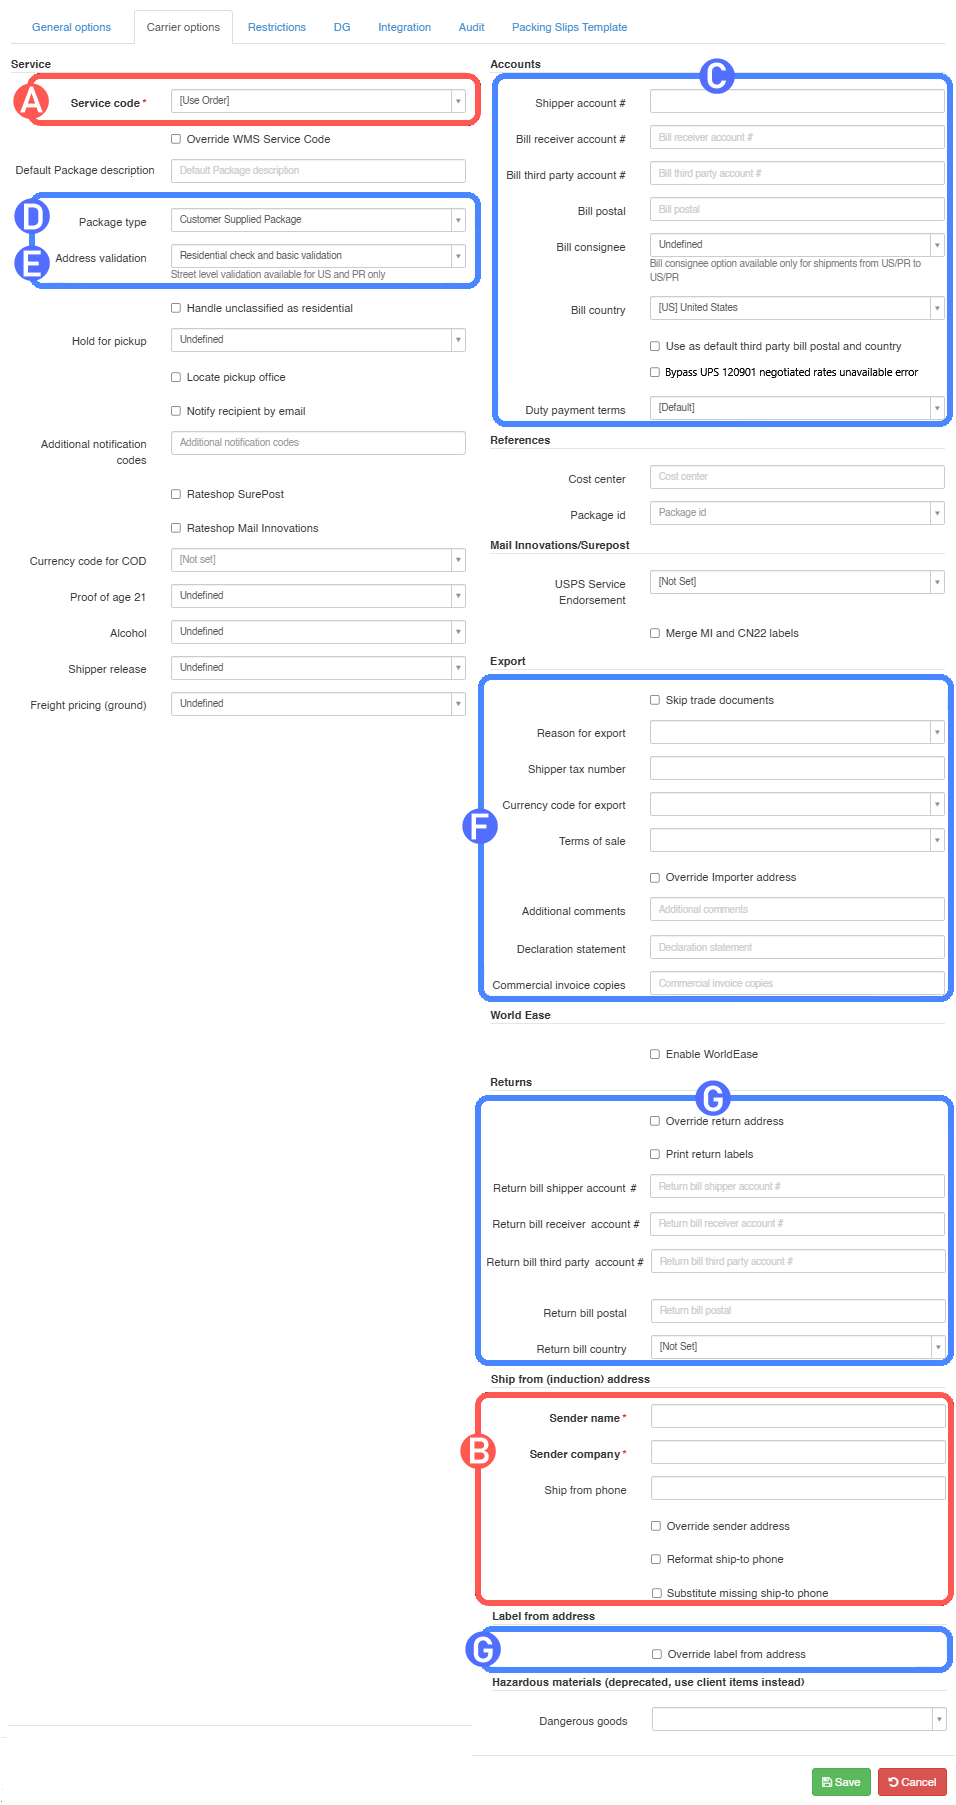
A) Service code: Choose a service code to assign to imported orders which don’t have a service code, or keep it if they have one. If you wish to overwrite any code coming from the WMS with the chosen service, check Override WMS Service Code.
You can choose between the service level that comes with the order, ECO mode, which grabs the cheapest service, or an arbitrary service level. For consolidator setups, use the applicable service subcode when you need to narrow shipping to a specific provider or service. You can go in depth on this subject in this article.
B) Ship from (induction) address: Specify the Sender name and Sender company for this UPS billing account. You can also override the sender address (by default, techShip will use the one defined on the source Carrier account) to an address different from the source. To do so, follow the steps from this article.
 WARNING: Complete the Ship from phone field in the Ship from (induction) address section. If this information is missing, the carrier may not process the order.
OPTIONAL SETTINGS
The following optional groups cover the most common Carrier Options settings. For the full field list, refer to the UPS Small Parcel Billing Account field details article linked above.
C) Accounts: Configure the billing account values used when applicable, such as Shipper account #, Bill receiver account #, Bill third party account #, Bill postal, Bill consignee, Bill country, Use as default third party bill postal and country, Bypass UPS 120901 negotiated rates unavailable error, and Duty payment terms. The Bypass UPS 120901 negotiated rates unavailable error option allows shipments to process when UPS returns tracking numbers, labels, and charges together with the 120901 Negotiated rates are unavailable at this time alert. When this option is disabled, the alert blocks processing. If you are billing a 3rd party, follow the instructions from this article.
D) Package type: Allows you to specify which Package type you will use. It could be a specific one or a variable value, depending on the case.
E) Address validation: Allows you to choose which address validation level to use. Not only the address is validated, but take into account that UPS detects residential areas, having impact in the charges and services to be used. If you are not sure of which level would be suitable for you, you can go in depth in this article.
F) Export fields: Configure export-related fields only when applicable, such as Reason for export, Shipper tax number, Currency code for export, Terms of sale, Additional comments, Declaration statement, and Commercial invoice copies.
G) Returns and address overrides: Configure return and address override behavior when applicable, including Override return address, Print return label, the related return address fields, and Override label from address.
RATE SHOPPING OPTIONALS
Depending on the services you will rate shop, if you include Surepost or Mail innovations, you should verify and check these accordingly:
- Rateshop Surepost: Includes Surepost results in the Rate Shopping
- Rateshop Mail Innovations: Includes Mail Innovations results in the Rate Shopping, make sure you verify additional setup requirements here Additional configuration to Rate Shop UPS Mail Innovations (MI) [Information]
- Skip Generic UPS Rateshop: If checked, it boosts Rate Shopping performance by ignoring (not including) UPS regular services and focusing in Mail Innovations services
WARNING: If you will ship Dangerous Goods note that the section in the Billing Account setup is deprecated and the How to specify Dangerous Goods shipping and Regulation type [Step-by-Step Guide] section should be used instead.
Press Save to apply the changes. If the information is valid, you'll be able to process orders through it.
SPECIFYING RATE SHOPPING SERVICE CODES (OPTIONAL)
If you are Rate Shopping with this account, you might want to specify which services you want be taken into consideration or excluded. Read this article to set up your inclusion/exclusion list.
Was this article helpful?
That’s Great!
Thank you for your feedback
Sorry! We couldn't be helpful
Thank you for your feedback
Feedback sent
We appreciate your effort and will try to fix the article