You assign a Markup Profile to a Client (Billing) Account through the Rates & Markups tab.
This guide covers selecting the pricing modes, assigning or changing your profile, and verifying the configuration.
 | For detailed conceptual information and advanced configuration, refer to Understanding Markup Profiles in techSHIP [Guide]. | |
| | ||
TABLE OF CONTENTS
- Before You Begin
- Assign or Change a Markup Profile
- Verify the Assignment with Controlled Data
- Resolve Common Selection Issues
Before You Begin
Confirm that you have the required access to edit the relevant Client (Billing) Account. For permission information, refer to techSHIP User Permissions Structure [Information].
Prepare an enabled Markup Profile for the account’s Carrier, with effective dates appropriate for your intended processing dates. To prepare or maintain the profile, refer to How to Configure and Manage Markup Profiles in techSHIP [Step-by-Step Guide].
For a configuration that also uses Smart Pricing, complete the applicable pricing setup described in Mastering Smart Pricing in techSHIP [Guide] before assigning the profile.
Assign or Change a Markup Profile
 | Saving a different Markup Profile changes the configuration used for rating and processing on this Client (Billing) Account; it is not a preview or an isolated test. You select one profile, with no automatic fallback between the two generations. Before saving, review the operational consequences in Understanding Markup Profiles in techSHIP [Guide]. | |
| | ||
 | Open Clients from the main menu. |
 | Click on the intended Client's Settings icon. |
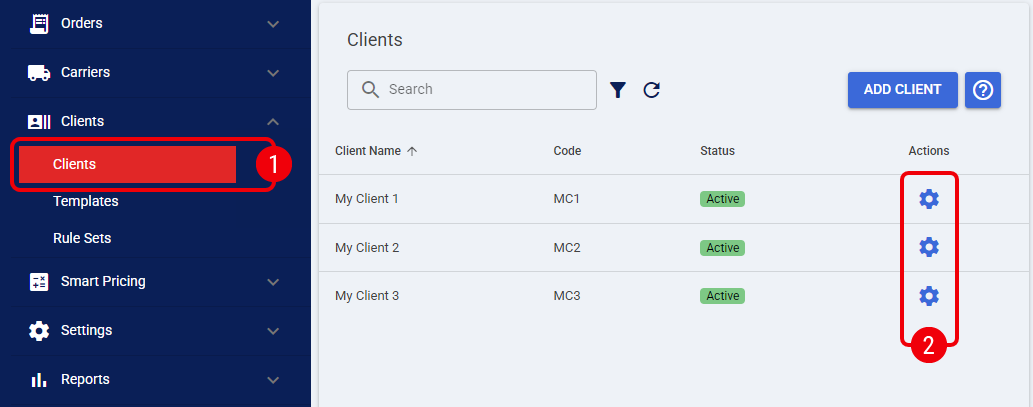
 | Click Edit for the relevant Client (Billing) Account. |
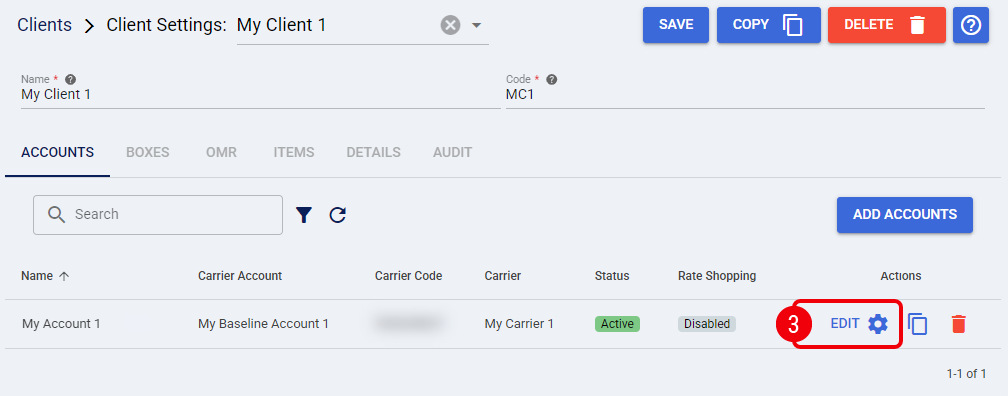
 | Select Rates & Markups and locate the Markup section. When replacing an existing assignment, record your current configuration before making changes. Configure the applicable fields below: |
- Rate Mode:
- Use Case A: Select Profile to apply your selected Markup Profile to the baseline cost.
- Use Case B: Select Smart Pricing Rates to use the Price dimensions defined in a Custom Pricing Table.
- Accessorial Mode:
- If Use Case A: Select Markup Profile.
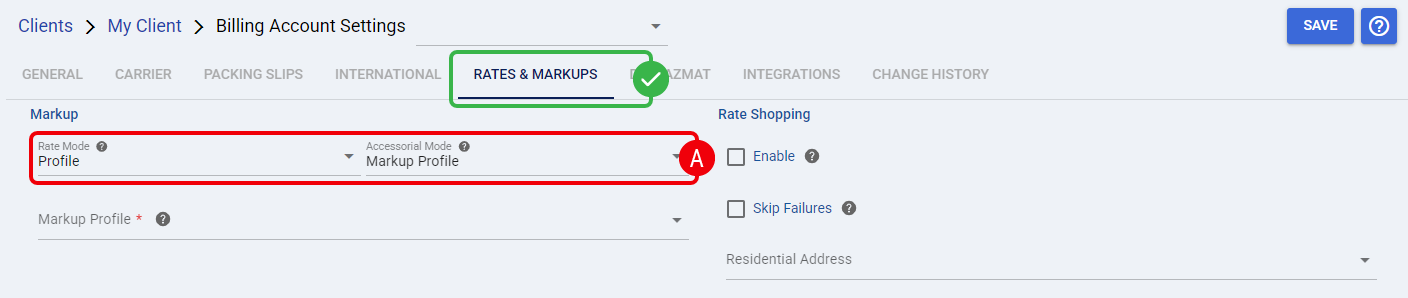
- If Use Case B: Select Markup Profile to apply your profile’s markup to the baseline accessorial costs. When using this configuration, you must also select the table that supplies your Price dimensions using the Custom Pricing Table field.
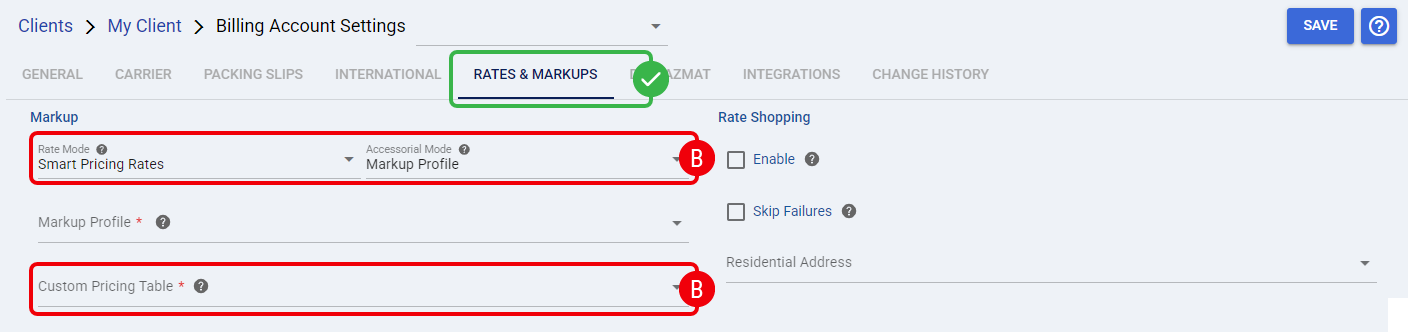
- If Use Case A: Select Markup Profile.
- Markup Profile:
- For Use Cases A & B: Select the profile to apply. You can type part of its name to narrow the results. When a divider is present, you see legacy profiles above the divider and profiles maintained in Markup Profiles (beta) below the divider. Within each block, you see profiles sorted alphabetically by name.
| Selecting Smart Pricing Rates overrides the rate source configured at the Carrier level. Review the intended pricing setup before saving. | |
| | ||
| Set Rate Mode and Accessorial Mode before selecting your profile. Changing Rate Mode, or changing Accessorial Mode to a value other than Markup Profile, clears the profile selection. | |
| | ||
| You see a divider only when both blocks contain results, including after searching. The options and the closed field display profile names only. Clear your search to review the full eligible list when necessary. | |
| | ||
 | Click Save. |
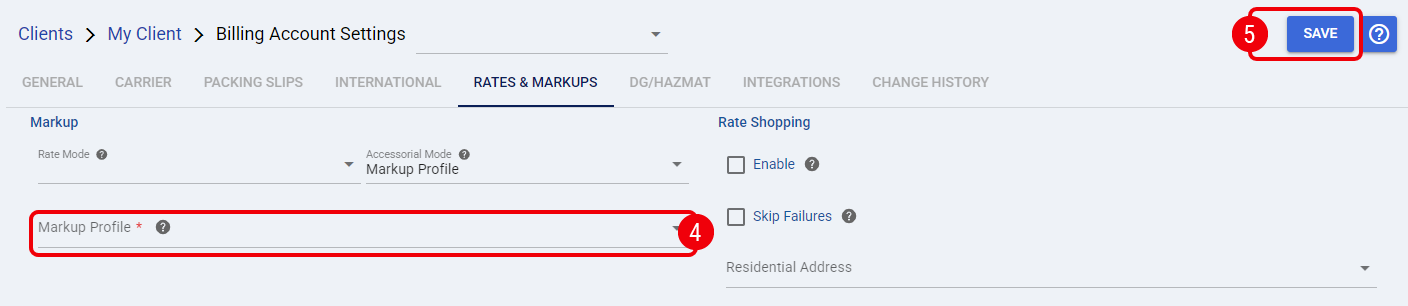
You have saved the assignment. Continue with a controlled operational check before relying on it for routine processing.
| To return to a previous configuration, repeat this procedure using your recorded pricing modes and any applicable Custom Pricing Table, and explicitly reselect the previous profile. You do not automatically recover the previous selection when switching generations, and changing the assignment does not copy or convert profile data. | |
| | ||
Verify the Assignment with Controlled Data
| Prepare a controlled test order for the same Client (Billing) Account, using a known Carrier, Service, weight, and origin/destination combination with an expected result. |
| If you recently edited the profile’s configuration, allow 30 seconds before rating or processing the test order. |
| Rate or process the test order through your established workflow and compare the resulting charges and markups with the expected outcome. |
Review any processing errors or unexpected amounts before continuing. Refer to Understanding Markup Profiles in techSHIP [Guide] for the relevant application and failure rules rather than assuming the previous profile will apply.
After confirming the expected result, continue with your normal order-processing workflow. Repeat this check whenever you change the assigned profile or its pricing modes.
Resolve Common Selection Issues
- You cannot see Markup Profile: Review your pricing modes. To assign a profile, select Profile in Rate Mode, or select Smart Pricing Rates with Markup Profile in Accessorial Mode. The combination of Smart Pricing Rates and Smart Pricing uses your pricing table and its mapped accessorial prices instead.
- You cannot find the intended profile: Clear the name search and confirm that the profile is enabled and matches the account’s Carrier.
- You can view Markup Profile but cannot change it: Confirm that you have client edit rights for this configuration. Refer to techSHIP User Permissions Structure [Information].
After resolving the issue, repeat the assignment verification before continuing with routine processing.
Was this article helpful?
That’s Great!
Thank you for your feedback
Sorry! We couldn't be helpful
Thank you for your feedback
Feedback sent
We appreciate your effort and will try to fix the article