Use Custom Pricing Tables in techSHIP to define Carrier costs, client prices, and surcharges within Smart Pricing.
This guide covers their configuration, the shared Pricing Dimensions and Zones & Areas resources, and how you apply your pricing strategy to Carriers and Client (Billing) Accounts. .
 | For a full overview of all new features, see: What's New in techSHIP: A Guide to the Latest Features [Information]. | |
Prefer listening? This podcast-style audio walks you through the article's key points.
| AI-Assisted & Human-Reviewed: For general information only. Please double-check important details. | |
TABLE OF CONTENTS
- Understanding Smart Pricing
- Building the Pricing Components
- Configuring Custom Pricing Tables
- Applying Your Pricing Strategy
Understanding Smart Pricing
You can use Simple Rates for basic custom-rate configuration. For more detailed control, use Custom Pricing Tables within Smart Pricing to define Carrier costs, client prices, and surcharges.
To ensure your profit margins are perfectly managed, the system separates your financial data into two fundamental dimensions:
- Cost: The actual baseline amount the carrier charges you.
- Price: The final billed amount you charge your customer.
Within a Custom Pricing Table, you define both Cost and Price values. You use Cost to evaluate Carrier expenses and Price to calculate client charges. With Split Mode, you configure Rates and Accessorials as separate calculation paths.
Core Architecture Components
When you configure a Custom Pricing Table, you combine the following components:
ENTITY | FUNCTION WITHIN SMART PRICING |
Pricing Dimensions | Defines the measurement brackets (e.g., weight tiers) used to segment shipping costs. |
Zones & Areas | Maps the geographic transit routes from an origin to a destination. |
Accessorial Collections | Groups variable or flat surcharges (e.g., fuel fees, custom conditions) into reusable profiles. |
Custom Pricing Tables | The central hub that consolidates your building blocks into a final routing framework. |
Service Levels | Specific shipping methods mapped within a pricing table, combining selected zones and dimensions. |
Rate Items | The editable numerical matrix, configured within each Service Level, where exact Cost and Price values intersect across your dimensions and zones. |
The following infographic visualizes the data flow and relationship between these foundational entities:
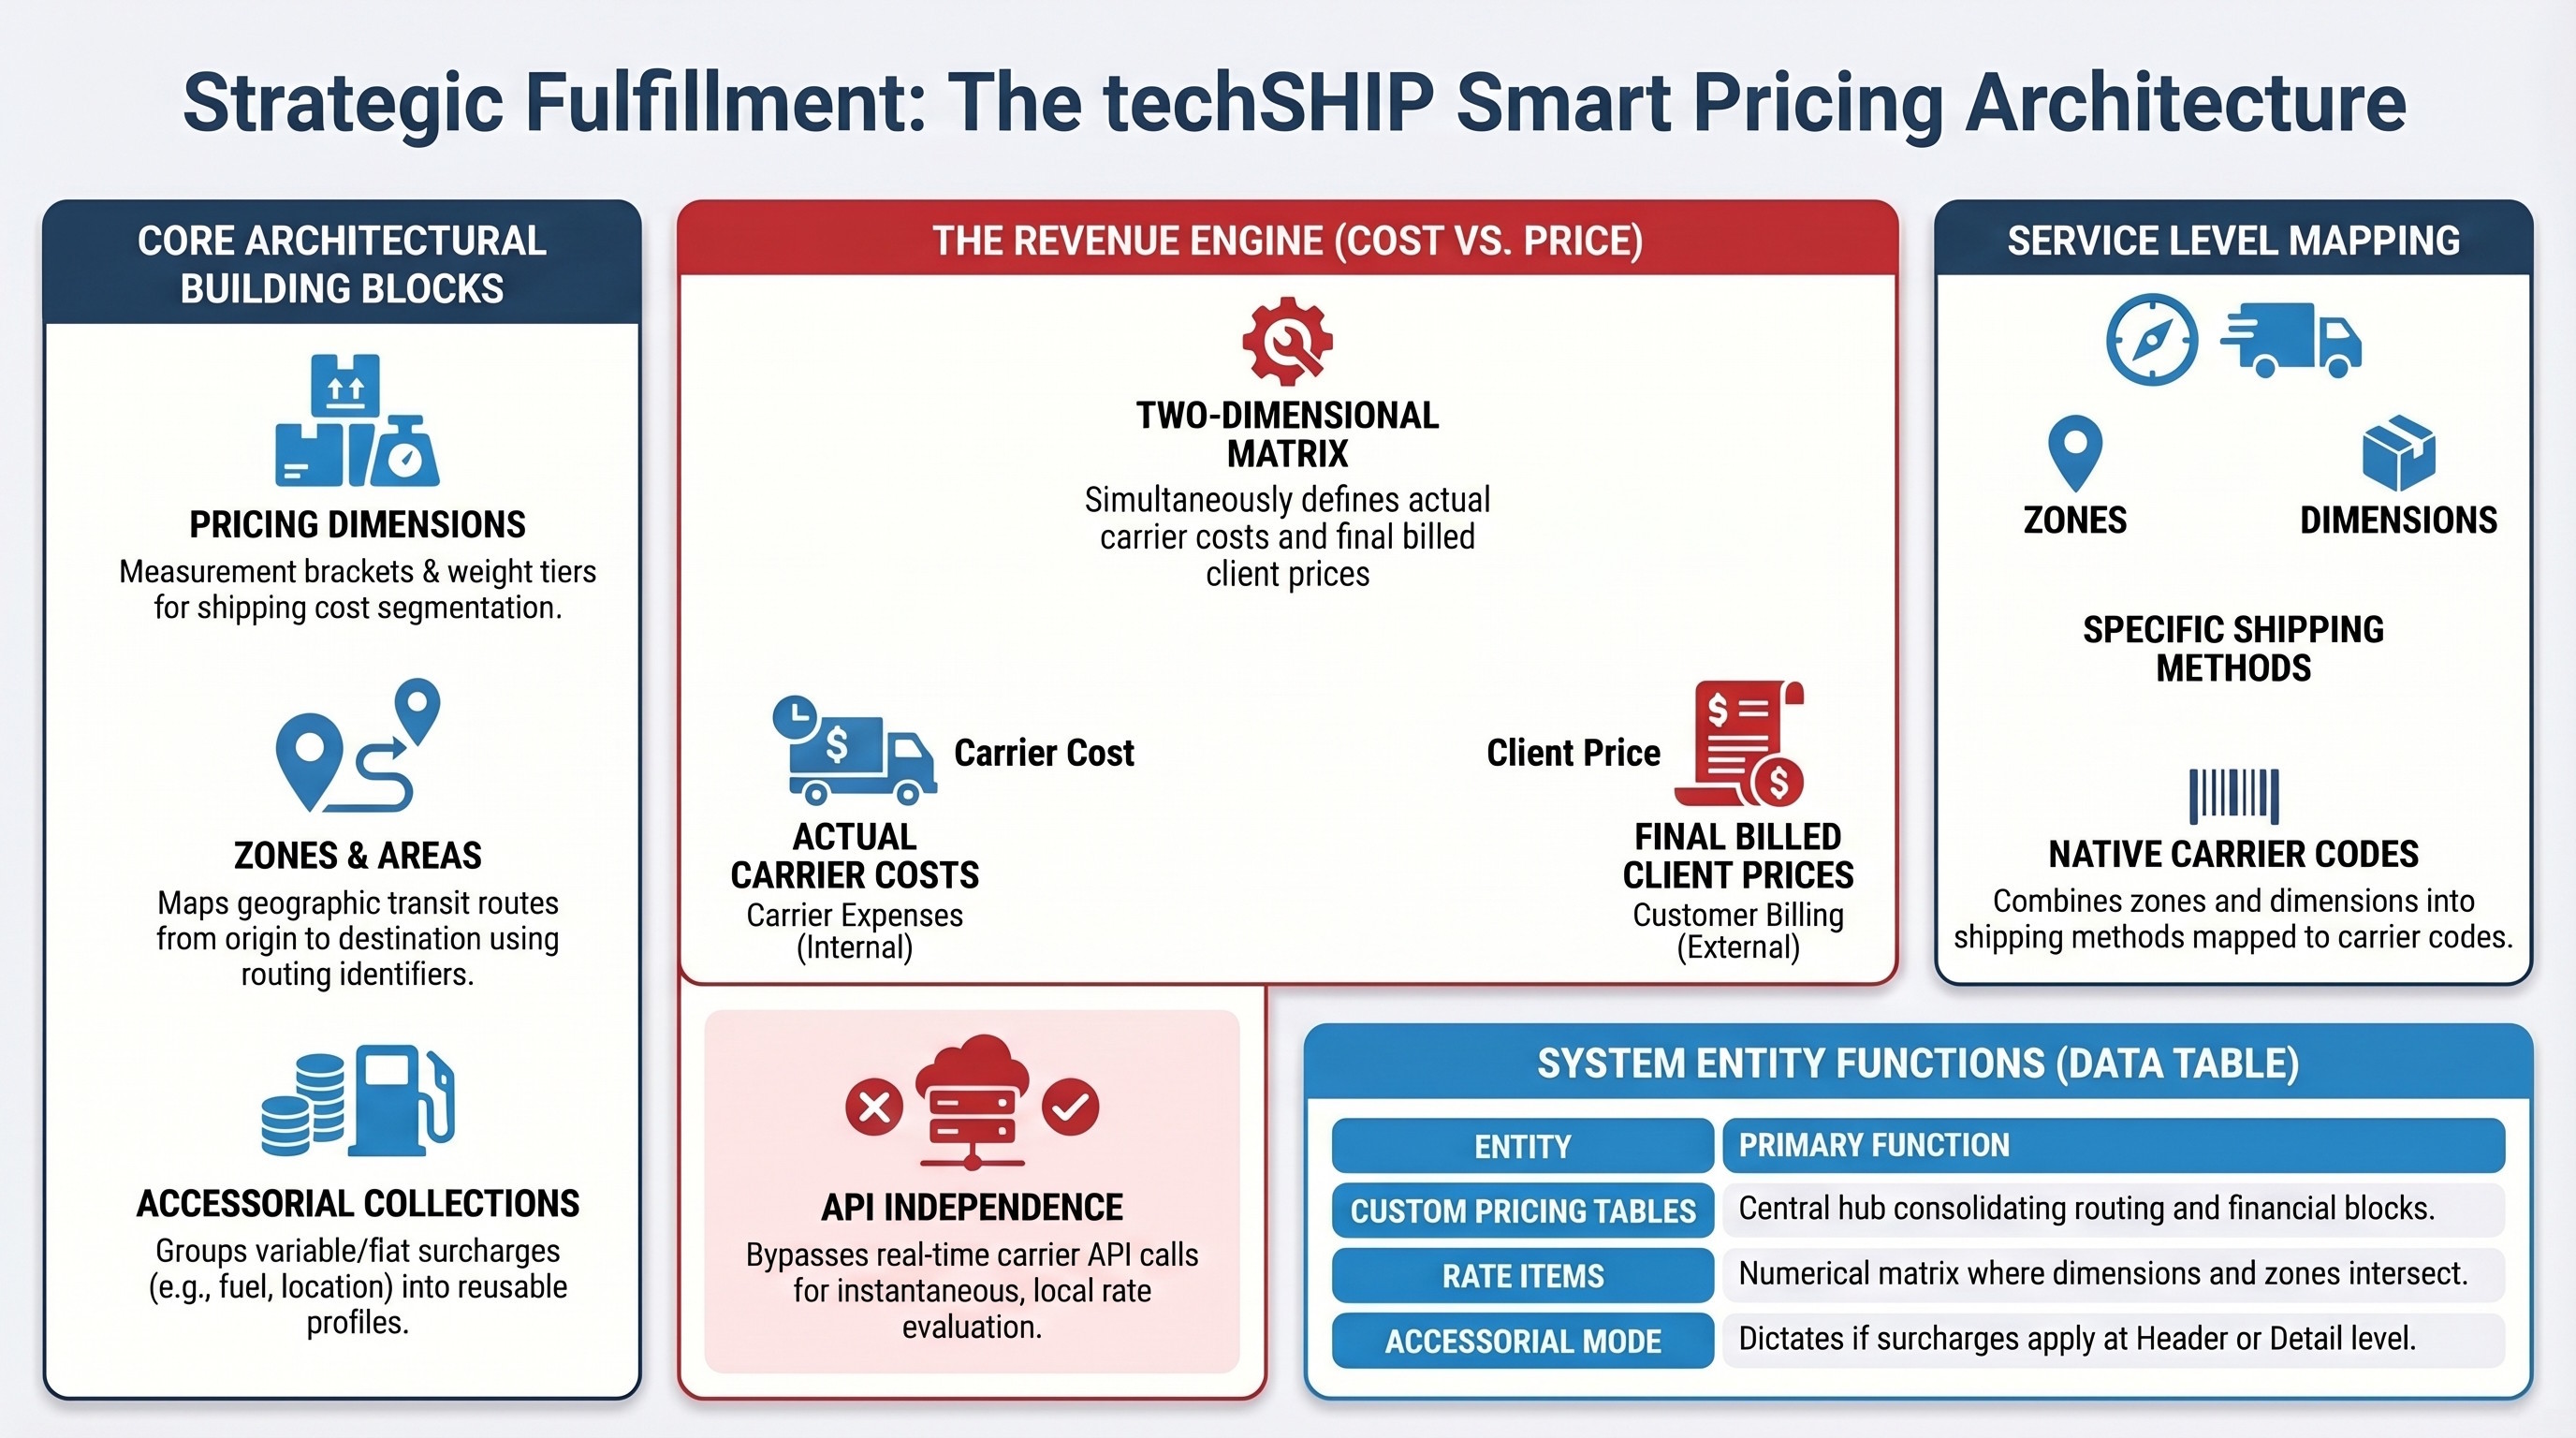
| All Smart Pricing resources belong to your central Organization and are shared seamlessly across all your specific Locations. You can also use the same Pricing Dimensions and Zones & Areas resources when configuring Markup Profiles. For detailed conceptual information and advanced configuration, refer to Understanding Markup Profiles in techSHIP [Guide]. | |
Building the Pricing Components
Prepare the components you need for your Custom Pricing Table using the dedicated configuration guides below. Continue with Accessorial Collections in this article when your pricing strategy requires additional surcharges.
Pricing Dimensions
You use Pricing Dimensions to define measurement brackets, such as weight tiers, for your pricing configuration.
To create a dimension, maintain its ranges, or update its items through a file, follow How to Configure Pricing Dimensions in techSHIP [Step-by-Step Guide].
Once your dimensions are ready, continue with Zones & Areas.
Zones & Areas
You use Zones & Areas to define geographic areas, shipping zones, and the mappings between origins and destinations.
To create and maintain these resources or review the use of supported [SYSTEM] mappings, follow How to Configure Zones & Areas in techSHIP [Step-by-Step Guide].
Once your geographic configuration is ready, continue with Accessorial Collections or Configuring Custom Pricing Tables, as required.
Accessorial Collections
An Accessorial Collection groups additional shipping surcharges into a single, reusable profile.
 | Click Accessorial Collections from the left menu under the Smart Pricing category. |
 | Press Create, provide a Code and Name, and save the record. |
 | The Code value is permanent and cannot be changed after creation. | |
 | Click the Edit icon on your newly created record to configure the specific surcharges. |
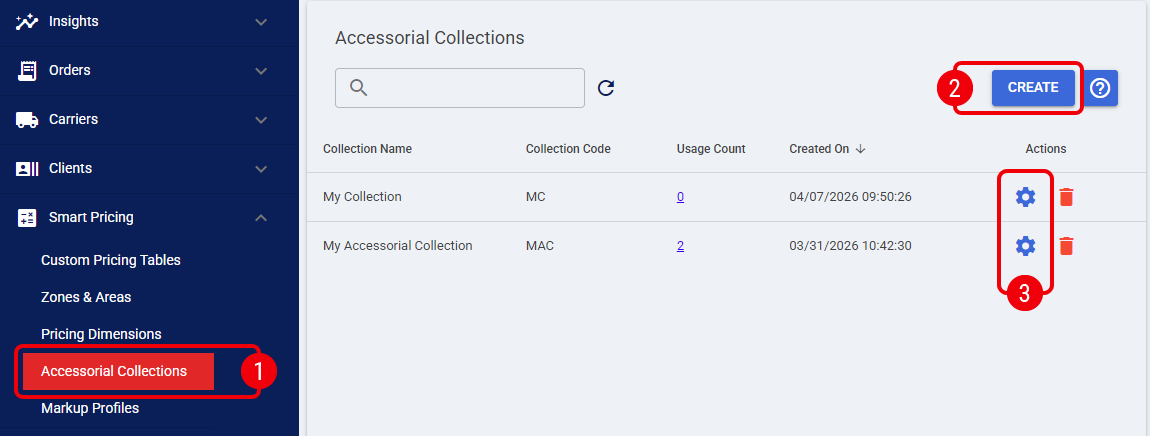
| Regardless of the accessorial type being created, you must define at least one calculation dimension: Price or Cost. | |
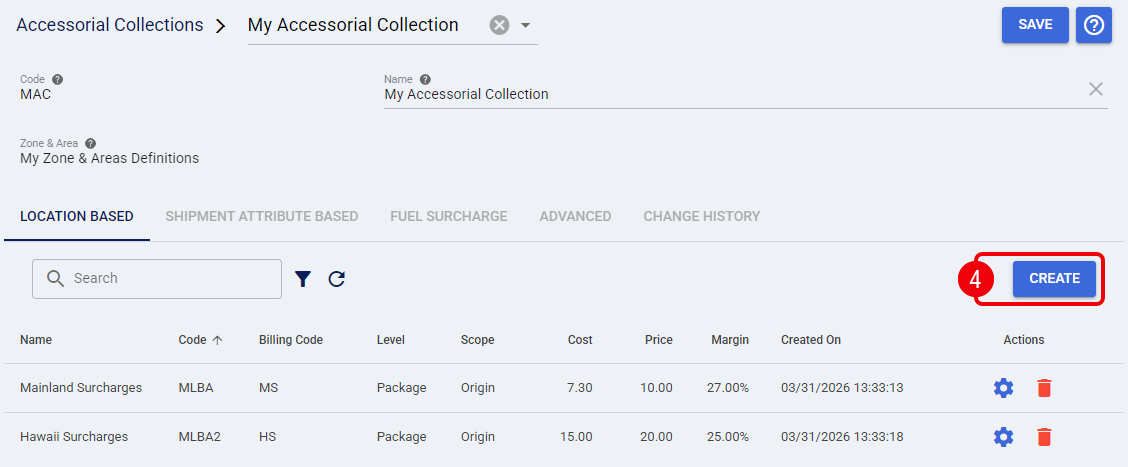
 | Under the Location Based tab, press Create to define geographic Area surcharges using flat Price and Cost values. |
| Selecting a master Zone & Area locks this mapping for the entire collection once the first location-based record is created. | |
| Ppredefined [SYSTEM] zones are not available for Location Based accessorials. You must map these surcharges to manually created Zones & Areas to ensure proper routing. | |
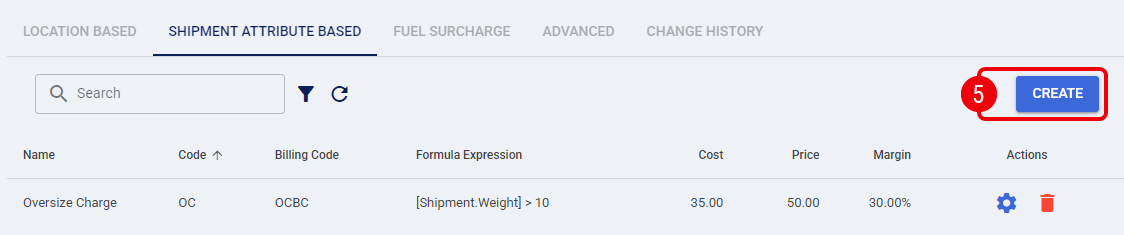
 | Under the Shipment Attribute Based tab, press Create to define surcharges triggered by a custom Condition using flat Price and Cost amounts. |
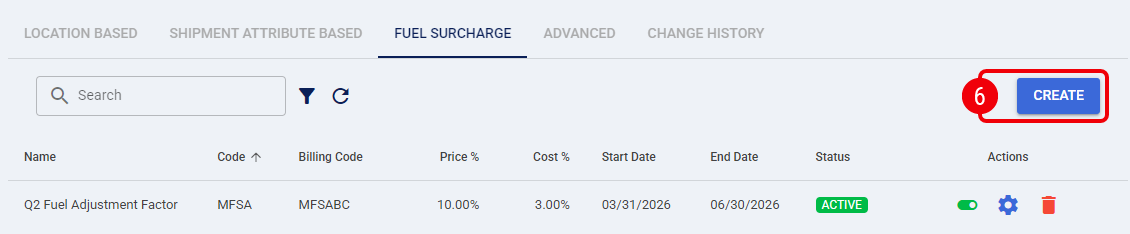
 | Under the Fuel Surcharge tab, press Create to define variable percentage fees evaluated over the Base Rate. Here, you can also define floor and ceiling constraints (Min Price, Max Price, Min Cost, and Max Cost). |
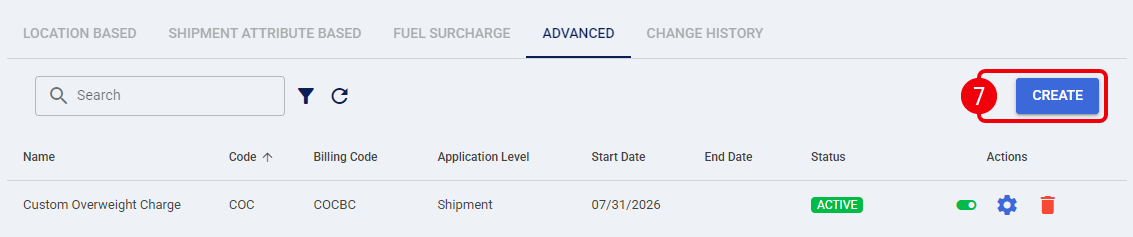
 | Under the Advanced tab, press Create to define highly custom logic. In this section, your Condition, Price, and Cost fields can all be dynamically evaluated using mathematical expressions. |
| This tab uses complex custom expressions. To minimize errors, prefer the predefined tabs. | |
| When configuring dynamic calculations, fields such as Condition, Price, and Cost use NCalc to evaluate expressions. Click the Edit icon to access the Expression Builder.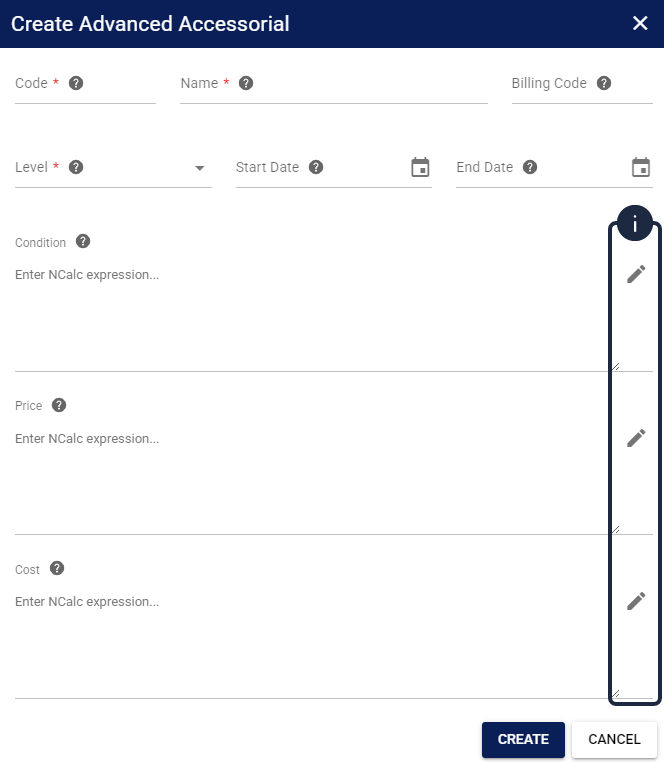 This builder provides a searchable dictionary of available properties and real-time syntax validation. 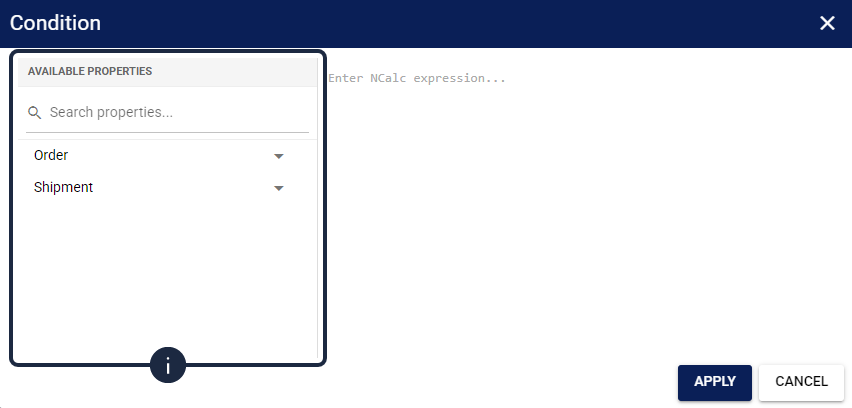 Follow these syntax rules:
| |
| Newly created Fuel Surcharges and Advanced accessorials are saved as Inactive by default. To apply these calculations, you must manually toggle the status to Active and properly configure the Start Date and End Date.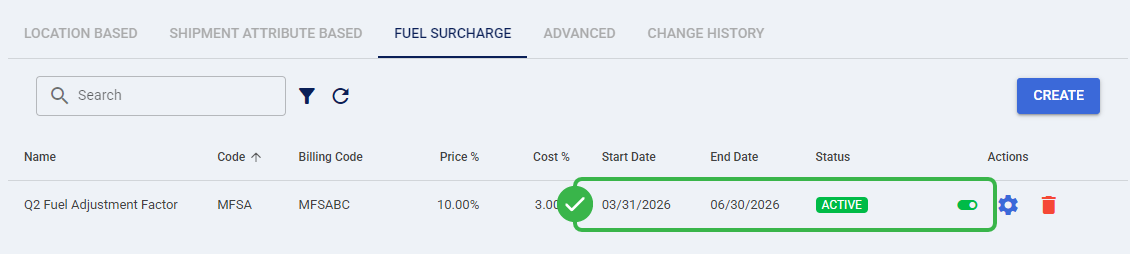 | |
The surcharge profile is now ready to be used. You can map these collections globally or at the service level from within your Custom Pricing Tables.
Configuring Custom Pricing Tables
A Custom Pricing Table acts as the central hub where your building blocks are combined to create the final rate matrix.
Creating Service Levels
| Click Custom Pricing Tables from the left menu under the Smart Pricing category. |
| Press Create, complete the required fields (Name and Currency), and save the record. |
| The Currency value is permanent and cannot be changed after creation. | |
| Click the Edit icon on your newly created record to configure the table properties. |
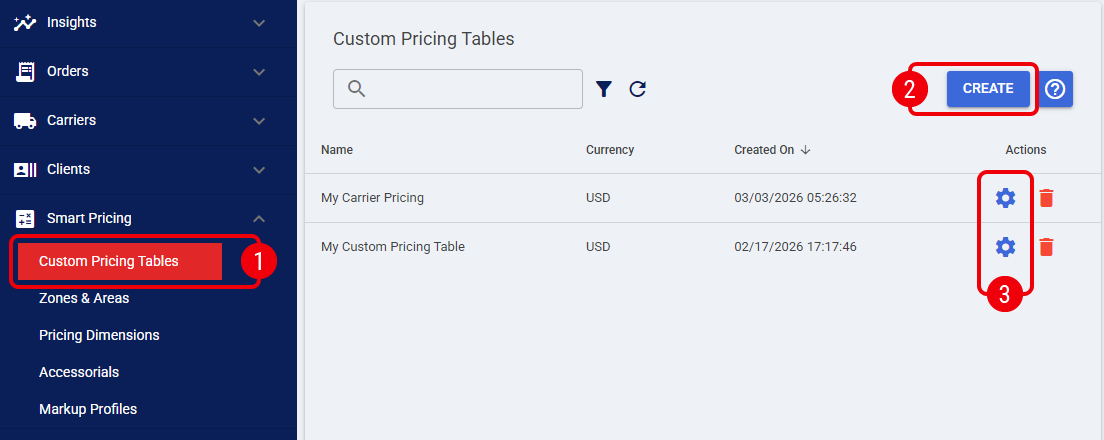
| Under the Service Levels tab, press Create and configure the service properties, ensuring you select your previously built Zone & Area and Pricing Dimension profiles to establish the core routing dimensions. |
| The defined Service Code must exactly match the native Service Code of the intended carrier. Unmatched codes will trigger order processing errors. | |
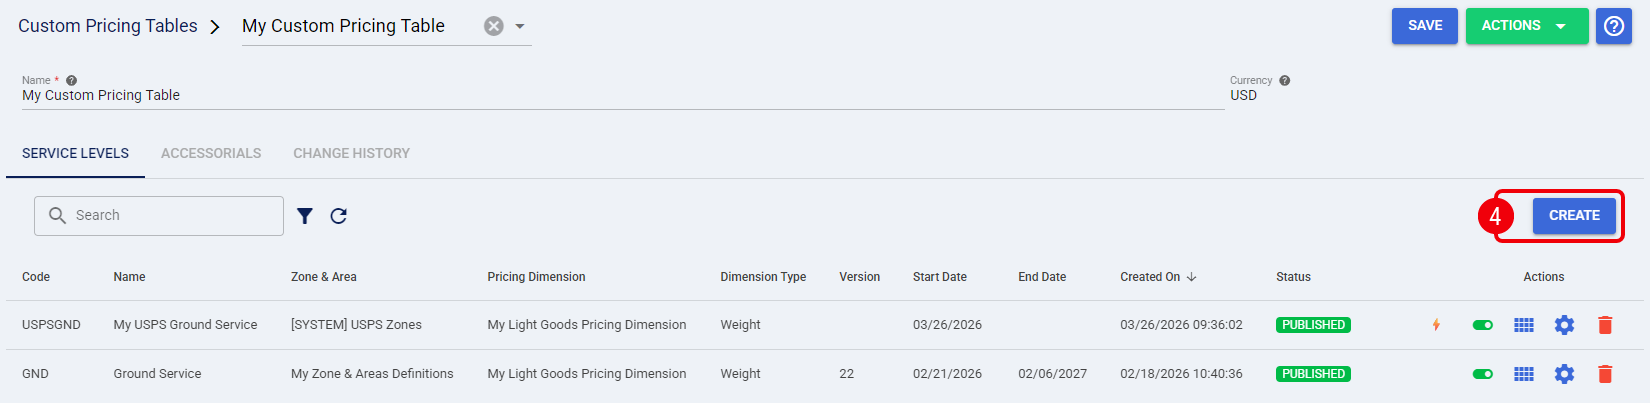
| For the Service Level to be actively evaluated, ensure the Status toggle is set to Published and properly configure the Start Date and End Date. These parameters strictly control whether the rates are applied during calculations. | |
AI Assistant
The techSHIP interface features a dedicated AI Assistant integrated directly into the Custom Pricing Tables page to help you troubleshoot your rating logic.
To open the chat interface, click the AI Assistant button located in the top-right corner when editing any Custom Pricing Table.
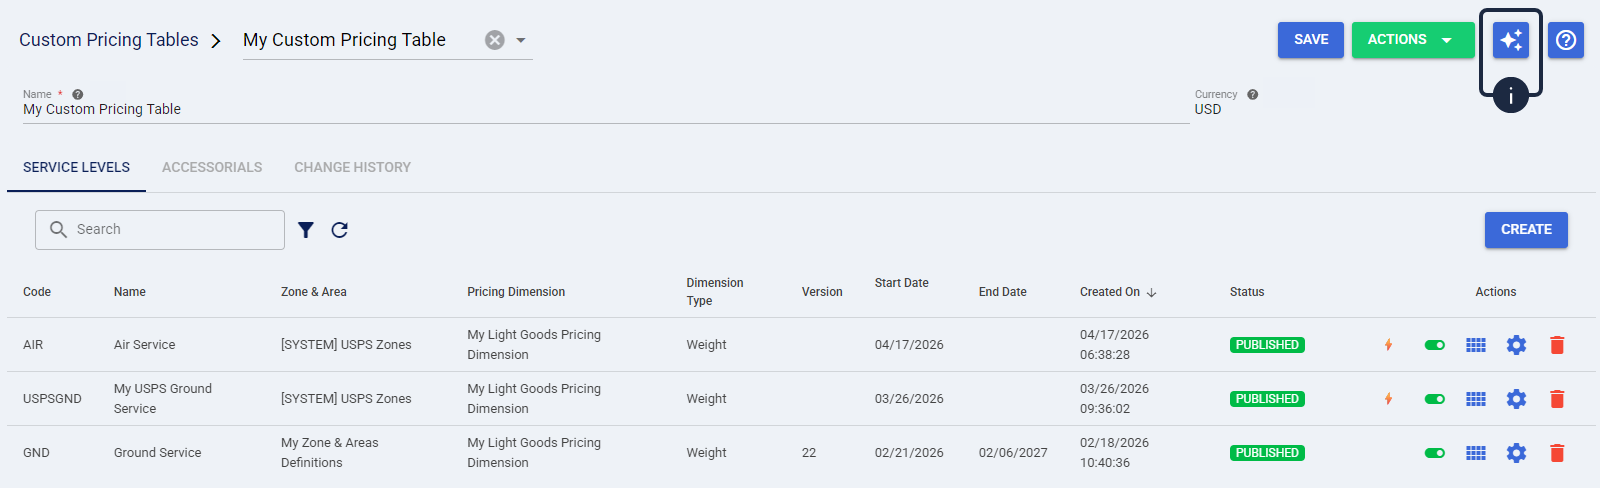
| For more information using the AI Assistant, see techSHIP AI Assistant: Overview & Availability [Information]. | |
Populating Rate Items
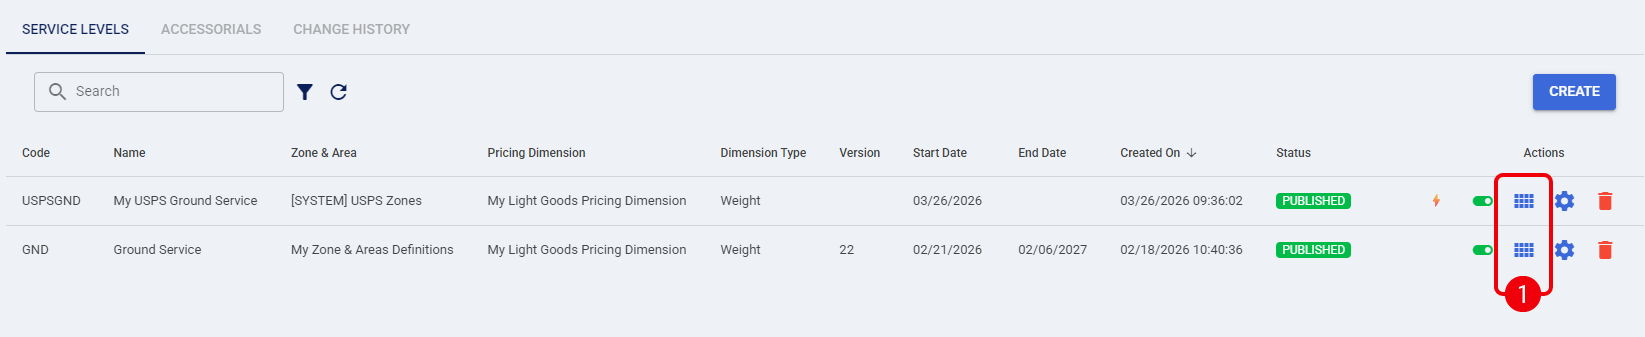
| In the Service Levels tab, click the Rate Items icon on a specific service row. |
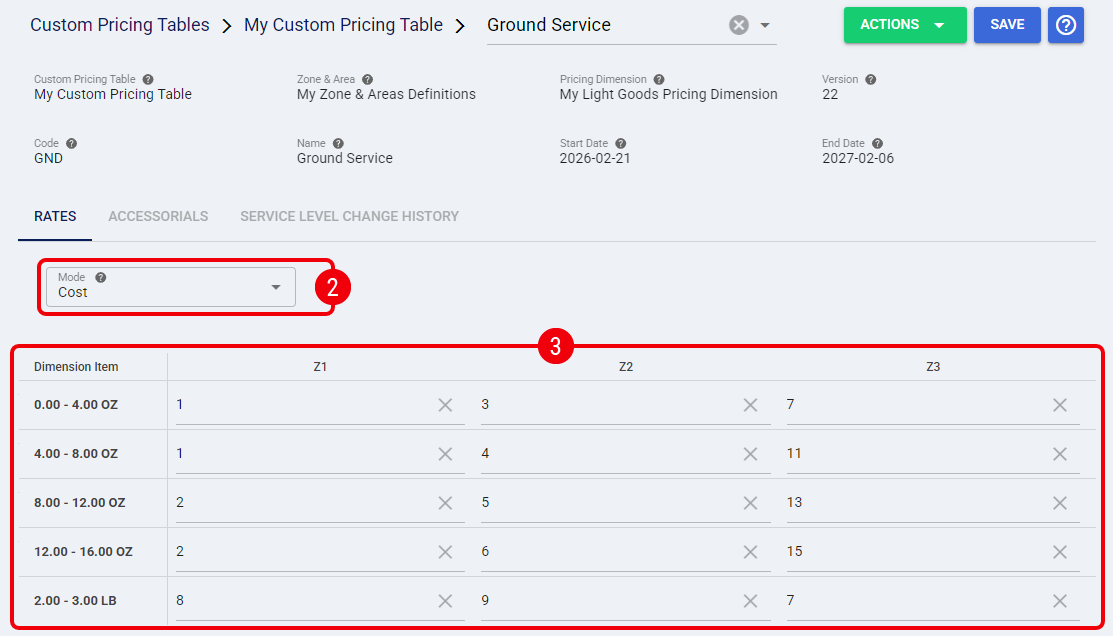
| Under the Rates tab, select your target Mode from the top dropdown. |
| Click directly into the intersecting matrix cells to edit their numerical values. Press the Tab key twice or click outside the cell to instantly save the value. |
| Tax amounts evaluated by the engine (including Canadian GST/HST/QST) are standard routing estimates. You must systematically verify all calculations to ensure financial compliance. | |
| To bypass manual UI entry, you can manage rate items using the Export and Import functions under the Actions menu. This allows you to bulk update your pricing matrix via spreadsheet. Keep in mind that importing a file completely replaces all existing rates for the service. | |
The numerical rate matrix is now saved and ready for rating calculations.
Mapping Accessorials (Header vs. Detail)
Surcharges can be mapped at two different architectural levels, dictating how they apply.
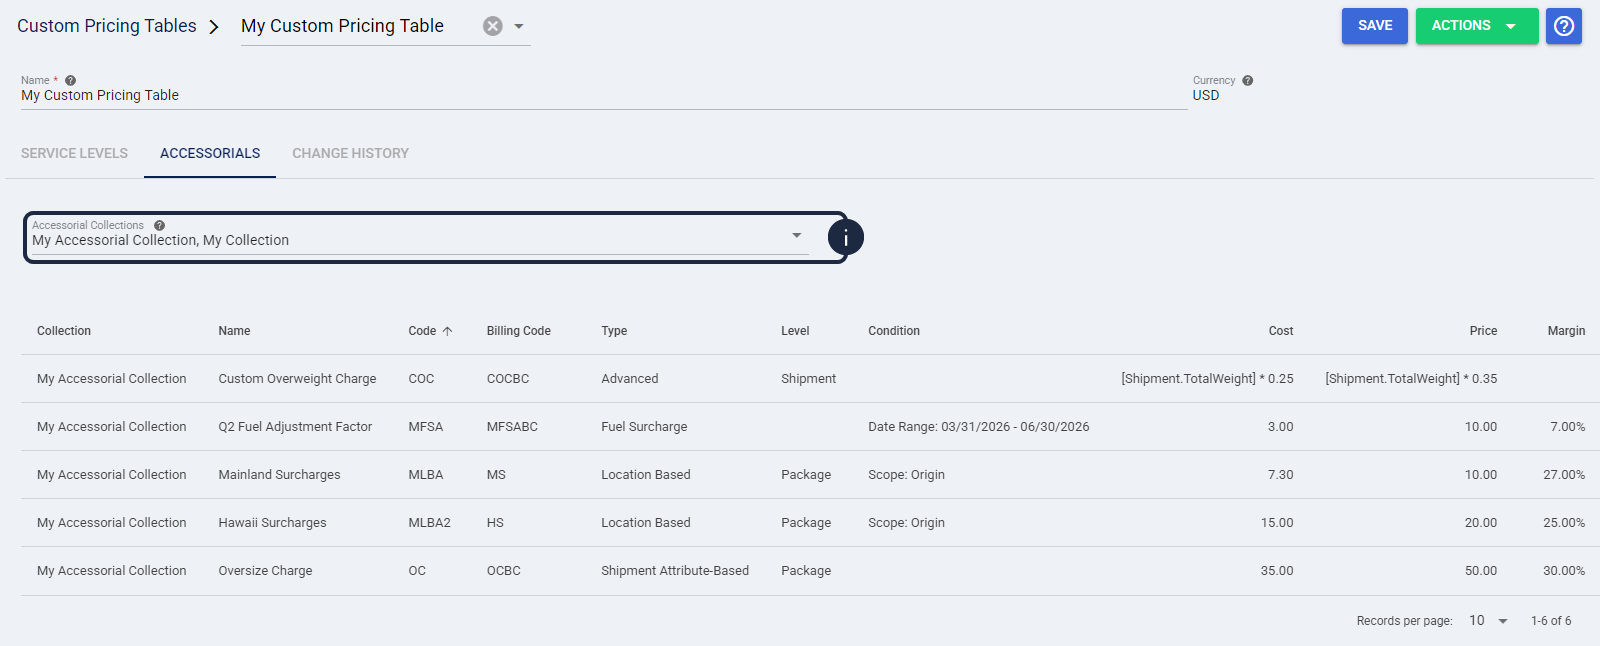
- Header Level (Global): To apply surcharges across every service within the table, go to the main Custom Pricing Table page, click the Accessorials tab, and assign your Accessorial Collections.
- Detail Level (Service-Specific): To apply surcharges to one specific service, open the Rate Items page for that service, click the Accessorials tab, and assign your Accessorial Collections.
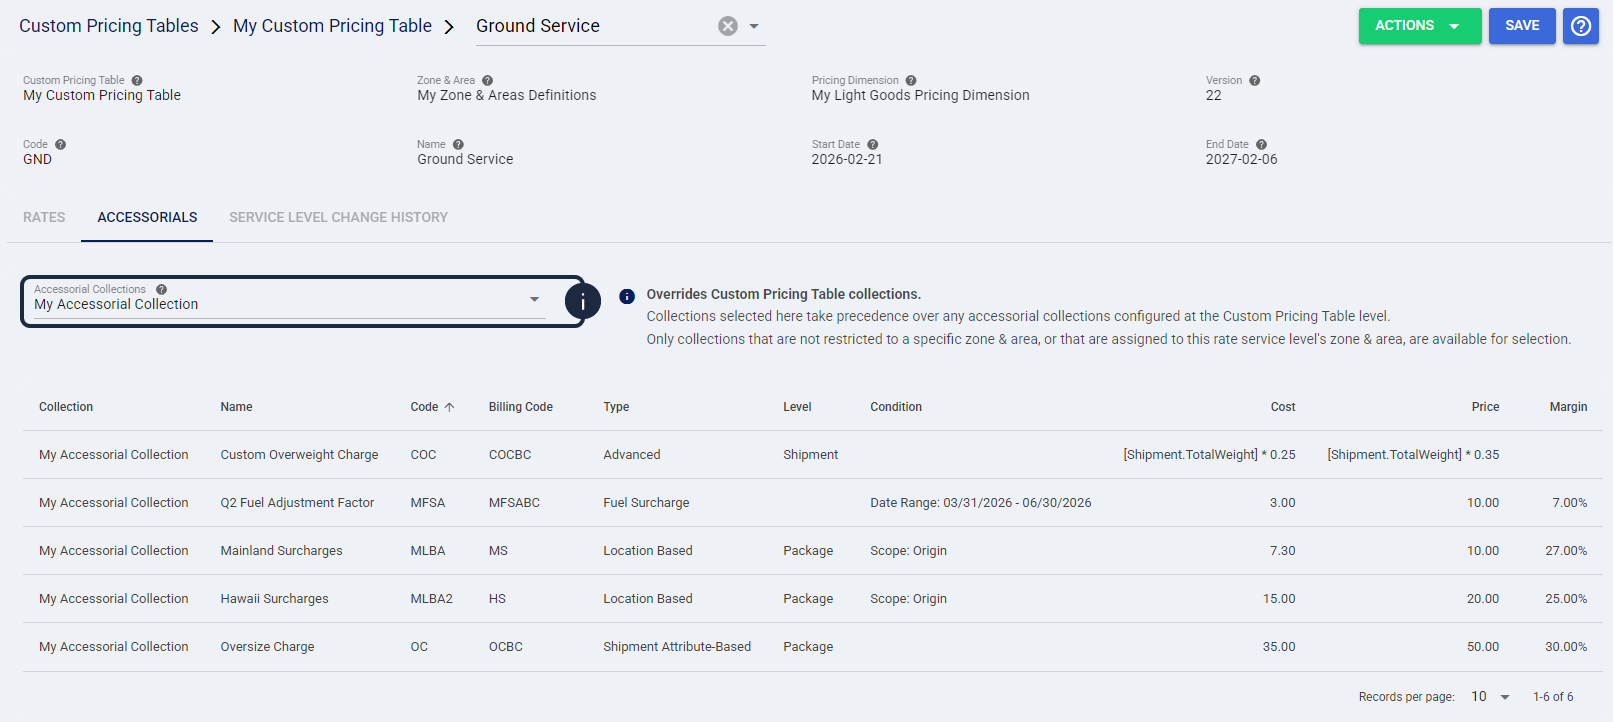
| Accessorial Collections mapped at the Detail Level completely override any global collections applied at the Header Level. For example, if a global profile has five rules and a service-specific profile has one, that specific service will only evaluate the single rule. When viewing the Service Levels grid, a lightning bolt (⚡) icon appears next to any service with detail-level accessorials configured, allowing you to quickly identify these local surcharge exceptions at a glance. | |
| When mapping accessorials at the Detail Level, collections containing Location Based surcharges will only appear as options if their assigned Zone & Area exactly matches the Rate Item. However, if the Rate Item utilizes [SYSTEM] zones, this restriction is bypassed, allowing you to map any Location Based accessorial collection to the service. Ensure you press Save after mapping your accessorials to apply the configuration.  | |
Applying Your Pricing Strategy
After configuring your Custom Pricing Tables, assign them to your Carriers to define costs and to your Client (Billing) Accounts to define client prices, as needed.
Defining Carrier Costs and Surcharges
This configuration overrides standard carrier API rates, extracting only the Cost dimensions from your matrix.
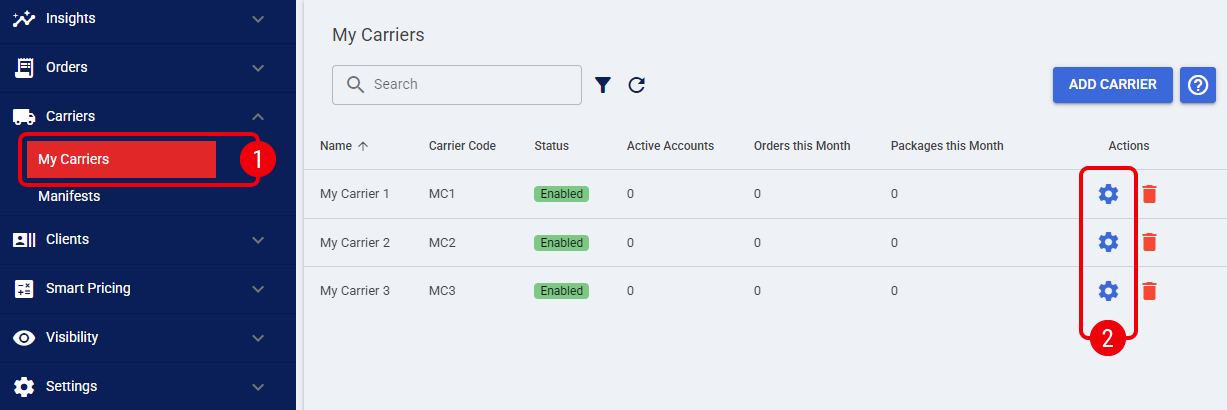
| Click My Carriers from the left menu under the Carriers category. |
| Click the Edit icon on a specific Carrier. |
| Click the Rates tab. |
| Set the Mode to Smart Pricing Rates (Cost). |
| Select your Custom Pricing Table from the dropdown menu. |
 | Press Save to apply your changes. |
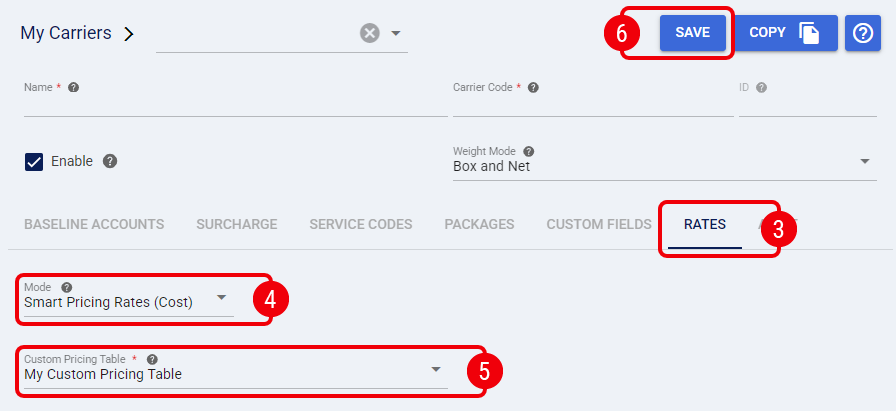
The carrier will now use your custom table to evaluate operational costs.
Defining Client Prices and Surcharges
This configuration extracts the Price dimensions and utilizes the split-mode logic to independently manage surcharges.
| Click Clients from the left menu under the Clients category. |
| Click the Edit icon on a specific Client. |
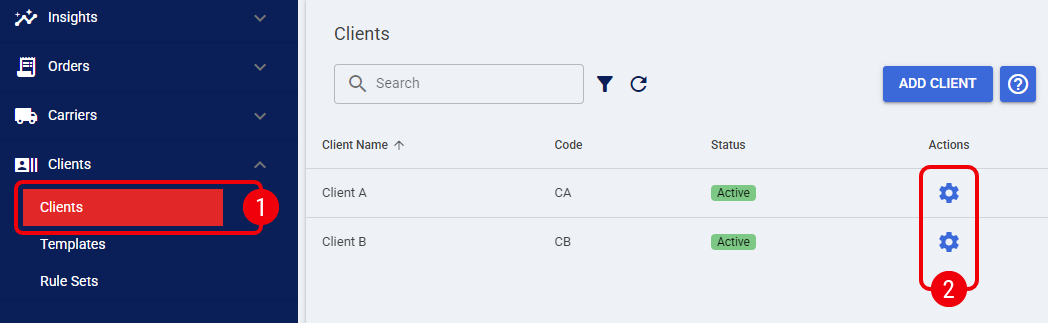
| Click the Edit icon on a (Billing) Account. |
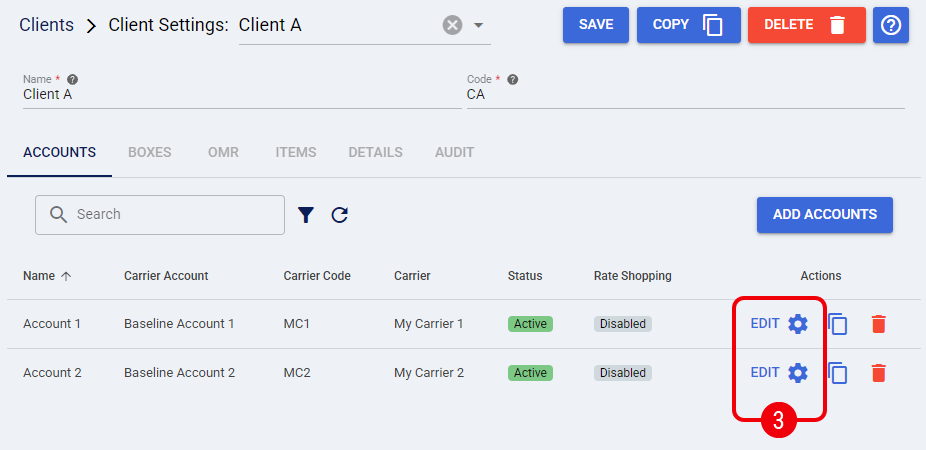
| Click the Rates & Markups tab. |
| Under the Markup group, set the Rate Mode to Smart Pricing Rates (Price). |
 | Select your Custom Pricing Table. |
 | Set the Accessorial Mode to either Smart Pricing (to use the custom surcharges configured in your table) or Markup Profile (to calculate fees mathematically over the baseline using a profile). |
 | Press Save to apply your changes. |
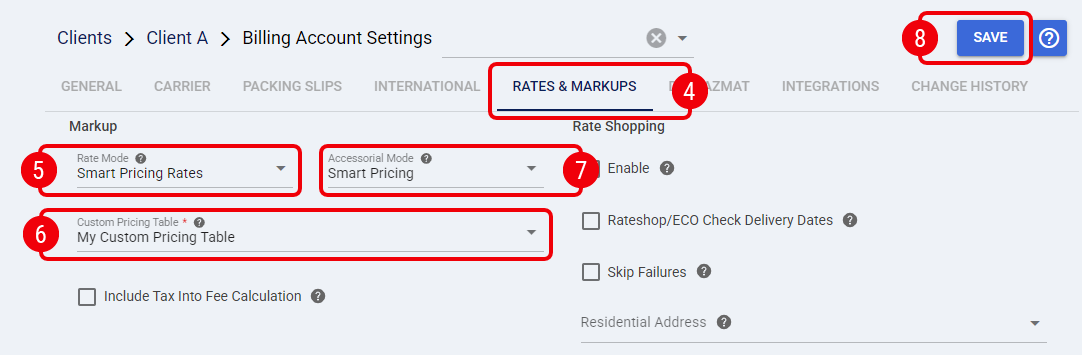
After saving, you have configured your Client (Billing) Account to use the selected Custom Pricing Table for prices and the selected Accessorial Mode for surcharges. Before using this configuration for routine processing, verify the calculated charges with a controlled test order, including the values returned to your Host System.
Was this article helpful?
That’s Great!
Thank you for your feedback
Sorry! We couldn't be helpful
Thank you for your feedback
Feedback sent
We appreciate your effort and will try to fix the article