Warehouses are fundamental entities required to operate and fulfill orders through your organizations in techOMS. You can manage standard physical locations or group them into unified virtual inventory pools.
This guide covers how to create, edit, and delete both physical and virtual warehouses within an Organization.
 | Before working with virtual warehouses, we strongly recommend reviewing Understanding Virtual Warehouses and Virtual Inventory [Information] to learn how virtual inventory levels are calculated and how they differ from physical locations. | |
| | ||
TABLE OF CONTENTS
Access the Warehouses Tab
| Make sure no Account is selected in the header switcher. | |
| | ||
 | Click Organizations from the left menu under the System Configuration section. |
 | Press Edit for the desired Organization. |

 | Click the Warehouses tab. |
You will see a list of all currently configured warehouses, categorized by type (Physical or Virtual).

To quickly view the physical locations that make up a virtual warehouse, click the chevron (arrow) icon next to the virtual warehouse's ID to expand the row and display its members.

Warehouse Properties
Depending on the type of warehouse you are configuring, the system will require different fields. However, both types share the following base identification fields:
- Name: Name of the warehouse, to easily identify it in UI lists.
- Code: A unique identifier used to map this warehouse with your Integrated System or for API integrations. This value is auto-generated by techOMS based on the initial warehouse Name and is hidden during creation, but you can manually edit it after the warehouse is created.
- Virtual: Checkbox that determines the warehouse type. Toggling this option dynamically updates the form to show or hide type-specific attributes:
- Unchecked: Configures a physical warehouse.
- Checked: Configures a virtual warehouse.
Physical Warehouse Specific Properties
Standard physical locations require the following specific configuration details:
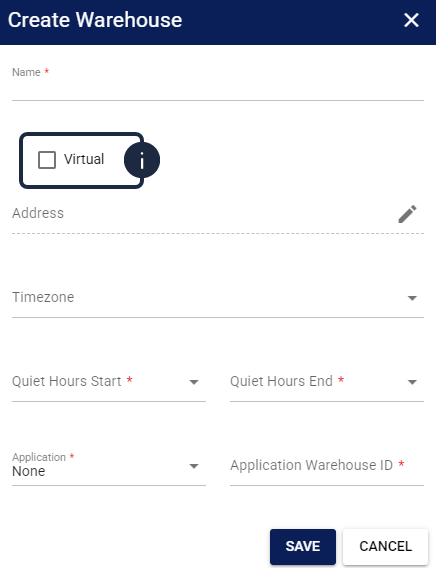
- Address: Click the pencil icon to deploy the fields and define the physical location's address.
- Timezone: Select the warehouse's time zone from the dropdown.
- Quiet Hours Start / Quiet Hours End: Define the operational downtime window for this facility.
Background sync jobs require processing time. For high-volume warehouses (50,000+ records), set Quiet Hours End 1 to 2 hours earlier than your physical warehouse's operational start time.
For example, if your physical downtime is from 8:00 PM to 12:00 AM, configure Quiet Hours End to 11:00 PM. This 1-hour buffer ensures techOMS completes final syncs before actual operations resume at 12:00 AM. - Application: Select the warehouse system application. To use the native techOMS manual packing module instead of an external system, you must select None.
Even when selecting None as the application type, configuring the Quiet Hours field remains mandatory to save the warehouse profile. For more information on the techOMS Packing Module, see: Understanding the techOMS Packing Module [Information]. - Application Warehouse ID: Set the external identifier used on the selected application to bind the techOMS entity with the external facility.
Virtual Warehouse Specific Properties
Virtual warehouses act as logical groupings and require these specific configuration details:
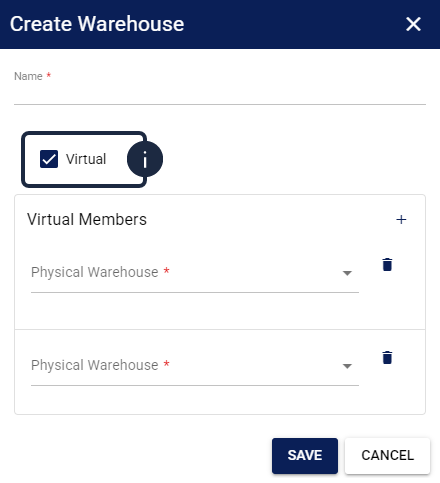
- Virtual Members: Define the physical warehouses that make up this virtual pool. You must select at least two physical warehouses. Use the following controls to manage the members:
- Plus icon: Click to add an additional member.
- Physical Warehouse Dropdown: Select the desired physical warehouse to include in the virtual pool.
- Trash can icon: Click to remove the corresponding physical warehouse from the virtual pool.
Manage Warehouses
You can use the search bar to locate specific facilities within the Warehouses tab before performing any action.
Create a Warehouse
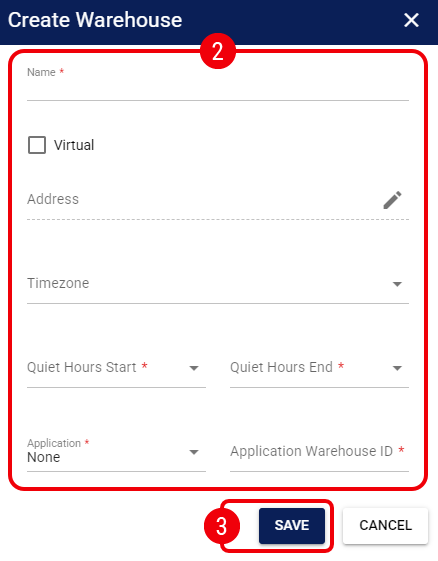
| Press Create. |

| Define the fields according to the desired warehouse type (refer to the Warehouse Properties section). |
| |
techOMS automatically generates the warehouse Code by capitalizing your entered Name and replacing spaces with dashes (e.g., entering "My Warehouse" generates the code MY-WAREHOUSE). If your provided name yields a code that already exists in the system (for example, if "My-Warehouse" was already created), the system will trigger a duplicate error, even if the text casing or spacing looks different. You can customize this Code later by editing the warehouse.
|
| Press Save to apply the changes and create the warehouse. |
Edit a Warehouse
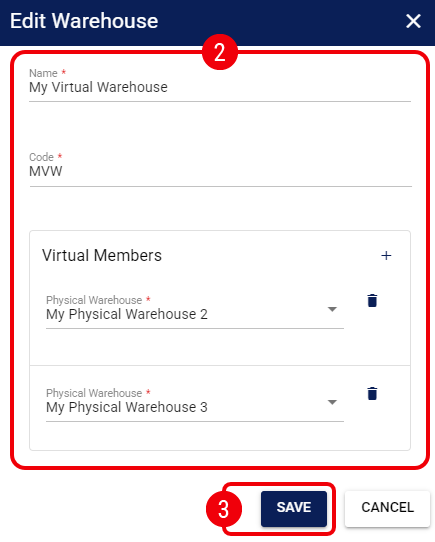
| Press Edit on the row of the warehouse you wish to modify. |

| Update the fields as needed based on the desired warehouse type (refer to the Warehouse Properties section). |
| For data integrity, you cannot change a physical warehouse into a virtual warehouse (or vice versa) after it has been created. The Virtual checkbox is intentionally removed from the Edit menu. You cannot edit physical warehouse properties from within a virtual warehouse's member list. To modify a physical warehouse, you must select it directly from the main Warehouses list. | |
| | ||
| Press Save to apply your changes. |
Delete a Warehouse
 | Deleting a warehouse is an irreversible action. Proceed with caution. You cannot delete a physical warehouse if it is currently assigned as a member of a virtual warehouse; you must remove it from the virtual pool first. | |
| | ||
| Press Delete on the row of the warehouse you wish to remove. |

| Click OK in the confirmation dialog. |

The warehouse is now deleted from the organization.
To continue setting up your fulfillment operations and enable these facilities for specific accounts, refer to How to Manage Account Warehouses and Fulfillment Channels [Step-by-Step Guide].
Was this article helpful?
That’s Great!
Thank you for your feedback
Sorry! We couldn't be helpful
Thank you for your feedback
Feedback sent
We appreciate your effort and will try to fix the article