You can set up automations in techOMS to control how information flows between your Sales or Fulfillment channels. This helps ensure that data stays updated without manual intervention.
This guide covers the configuration of webhook and recurring jobs for both stable and beta channels.
 | Make sure that you are operating at the right Account beforehand. | |
| | ||
TABLE OF CONTENTS
Automation Modes
There are two automation modes in techOMS:
- Webhook Jobs: These are instant updates that occur whenever a specific event happens in the channel (e.g., a new order or a status change).
- Recurring Jobs: These are scheduled updates that run automatically at set intervals (e.g., every hour, daily) to keep data synchronized. Recurring jobsare further divided based on channel type:
- Stable channels: Configured at the account level, affecting all channels within that account.
- Beta channels: Configured individually for each channel, allowing you to set up different schedules and settings for each.
| Jobs for stable and beta channels are independent. Configurations for Stable channels do not impact jobs set up for Beta channels within the same account. | |
| | ||
To determine which channels support each mode, refer to:
- techOMS Sales Channels - Master List [Guides List]
- techOMS Fulfillment Channels - Master List [Guides List]
The following table summarizes each mode:
MODE | COMMUNICATION | FREQUENCY | SCOPE |
Webhook Jobs | Push (event-driven) | Real-time | Channel-specific |
Recurring Jobs | Pull (scheduled polling) | Fixed intervals | Stable: Account-wide Beta: Channel-specific |
 | Changing automation modes can result in data loss. If you switch a Sales or Replenishment Channel's Mode from Webhooks to any other setting, the system will automatically delete all previously configured webhooks. Fulfillment Channels are unaffected by this change and will retain their webhooks. | |
| | ||
| Due to system caching, please allow up to 1 minute for any mode changes to fully take effect across the system. | |
| | ||
Webhook Jobs
To configure webhook jobs for a specific channel:
| Make sure your channel's webhook mappings are properly set up before you continue. For setup instructions, refer to your channel's guide in the master lists mentioned above. The setup process is the same for all channels. Screenshots in this guide use beta sales channels as an example. | |
| | ||
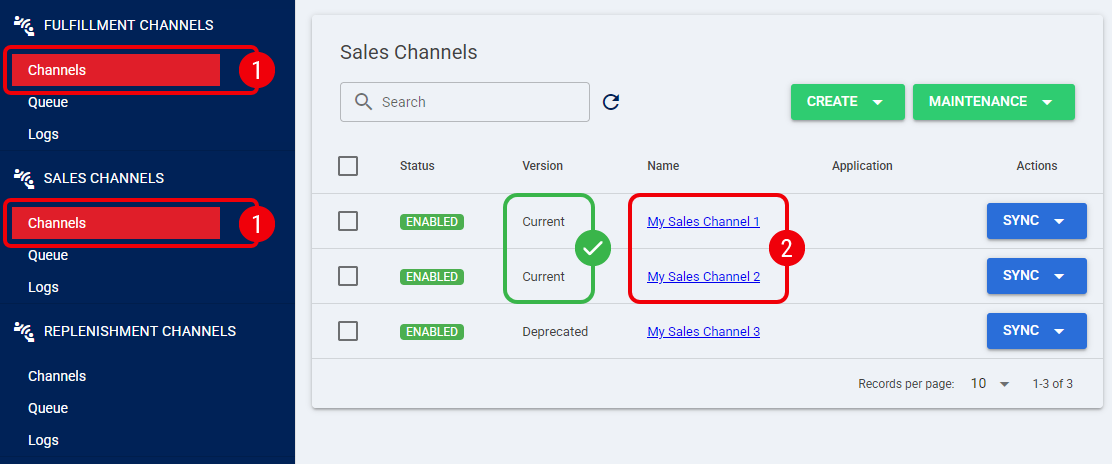
 | Click Channels from the left menu under either the Sales or Fulfillment Channels section. |
 | Click on the desired channel. |
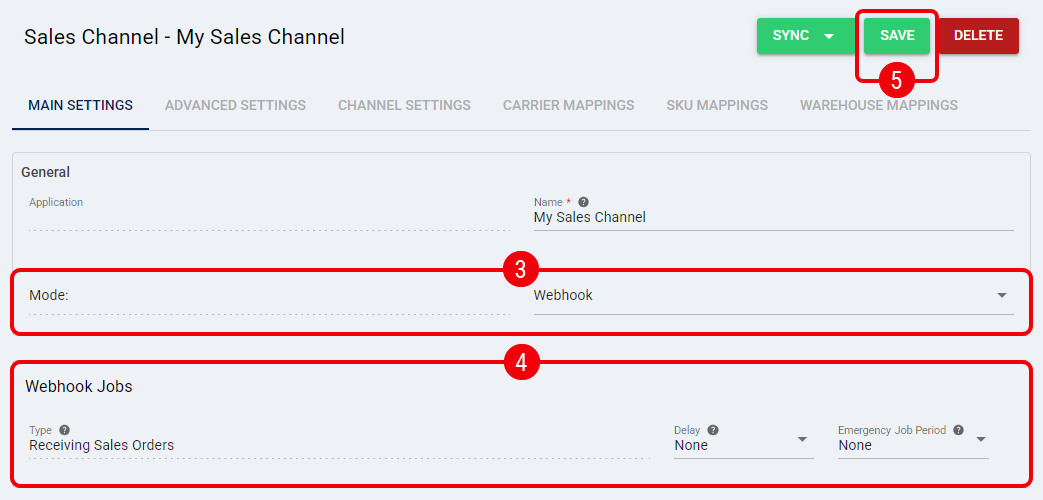
 | Select Webhook in the Mode drop-down field. |
 | Configure the necessary parameters for each Webhook Job Type: |
- Delay: Specifies how much time the webhook job waits before triggering after an event is detected.
| If Virtual Allocation is enabled, the Delay field no longer delays the job. Instead, whenever applicable, it acts exclusively as the internal release timer for the order. For detailed conceptual information and advanced configuration, refer to Understanding Sales Order Holds and Virtual Allocation [Information]. If set to None, no delay will be applied. | |
| | ||
- Emergency Job Period: Defines the time interval at which an emergency recurring job will automatically run if the webhook job fails to trigger as expected. This acts as a fallback to ensure data is eventually synchronized.
| If set to None, the job will not run. | |
| | ||
 | Press Save. |
The webhook automation is now active and will process channel events in real-time.
| Continue as detailed in How to set up Sales/Fulfillment Channel Webhooks [Step-by-step guide] to configure additional webhook parameters. | |
| | ||
Recurring Jobs
| Recurring Jobs execute the same logic as manual synchronization. To understand the specific behavior and expected results of each job type (e.g., how Receive Shipments handles zero quantities), refer to: How to Synchronize data through a Fulfillment Channel [Step-by-step guide]. The visibility of Import and Export Products jobs is determined by your account's Master Product Source configuration. techOMS will automatically manage the availability of these options to align with your selected source of truth. For more information, see Understanding the techOMS Master Product Source [Information]. | |
| | ||
Recurring Jobs for Stable Channels
To configure recurring jobs for all stable channels in an account:
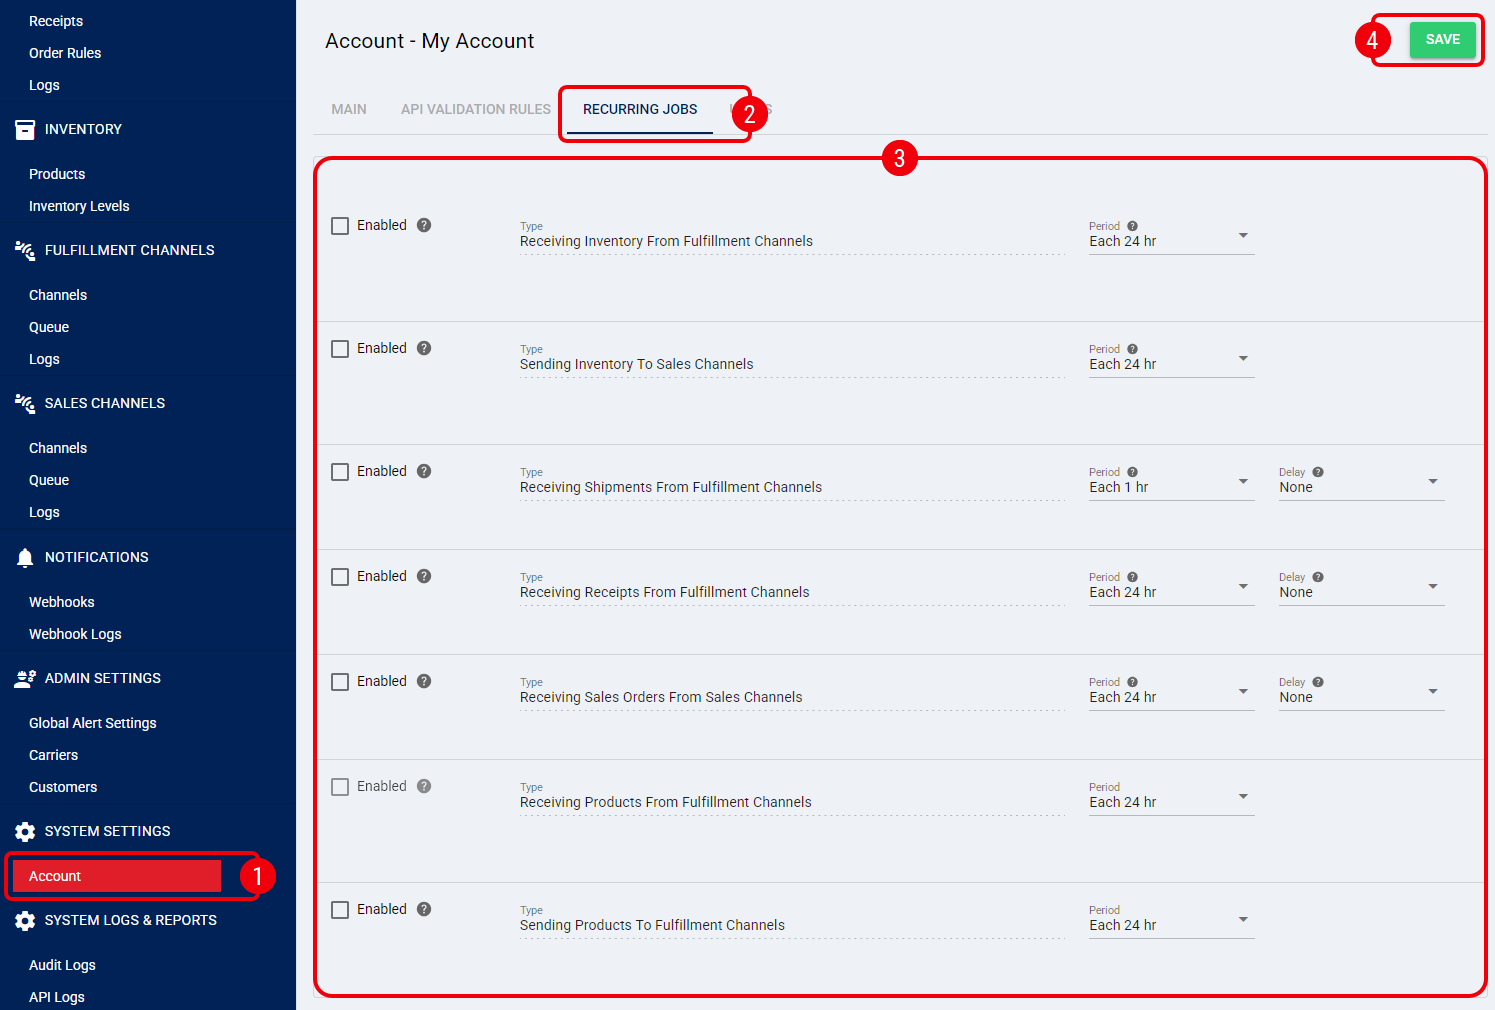
| Click Account from the left menu under the System Settings section. |
| Click the Recurring Jobs tab. |
| Configure the necessary parameters: |
- Enabled: Check the box to activate the recurrent job.
- Type: Indicates the action the job performs.
- Period: How often the job runs (e.g., how often you expect to receive orders).
- Delay (when applicable): Delays the job execution by a specified time (None, Minimal 5 minutes, or explicit options).
| Make sure product-related recurring jobs align with the Account's Master Product Source setting. Otherwise, this can result in unnecessary or misleading logs. For details, see Understanding the techOMS Master Product Source [Information]. | |
| | ||
| Press Save to apply the changes. |
The recurring jobs are now active and will synchronize data across all stable channels at the set intervals.
Recurring Jobs for Beta Channels
To configure recurring jobs for a specific beta channel:
| The setup process is the same for all beta channels. Screenshots in this guide use beta sales channels as an example. | |
| | ||
| Click Channels from the left menu under either the Sales Channels or Fulfillment Channels section. |
| Click on the desired channel. |

| Select Recurring Job in the Mode drop-down field. |
| Configure the necessary parameters for each Recurring Job Type: |
- Delay: Specifies how much earlier the job will execute within the defined Main Job Period.
| If Virtual Allocation is enabled, the Delay field no longer delays the job. Instead, whenever applicable, it acts exclusively as the internal release timer for the order. For detailed conceptual information and advanced configuration, refer to Understanding Sales Order Holds and Virtual Allocation [Information]. If set to None, no delay will be applied. This option is available for selected recurring jobs. | |
| | ||
- Main Job Period: Defines how often the job runs.
| If set to None, the job will not run. Available frequencies depend on the channel and the recurring job. | |
| | ||
| The Delay and Main Job Period fields work together as follows: the execution window defined by the Main Job Period will be shifted earlier by the time specified in the Delay field. For example, if the Main Job Period is set to "Each 8 hours" and the Delay is "1 hour", a job originally scheduled between 08:00 AM and 04:00 PM will instead run between 07:00 AM and 03:00 PM due to the shift. To prevent synchronization errors, techOMS automatically manages background emergency fallback jobs based on your configuration. If you disable a Main Job, or switch the channel Mode to Recurring Job By ID, the system will automatically disable the associated emergency fallback job. | |
| | ||
| Press Save. |

The recurring job is now active and will synchronize the channel's data at the specified intervals.
| To further configure beta sales channel-related automations—such as Inventory Settings and Other System Settings—refer to Main Settings of a Beta Sales Channel [Information]. | |
| | ||
Was this article helpful?
That’s Great!
Thank you for your feedback
Sorry! We couldn't be helpful
Thank you for your feedback
Feedback sent
We appreciate your effort and will try to fix the article