Creating Purchase Orders within techOMS enables you to efficiently manage vendor purchases, track item costs, and maintain an accurate inventory pipeline.
This guide covers the manual procedure to create a Purchase Order, configure item quantities and line costs, and assign the appropriate workflow status.
 | While this action is typically handled via automated integrations with your Fulfillment Channel, this article describes the steps and fields involved in the manual creation process. For more information, refer to How to configure Automations for Sales/Fulfillment channels [Step-by-Step Guide]. | |
| Make sure you are operating under the correct Account before starting.
| |

TABLE OF CONTENTS
- Accessing the Creation Menu
- Configuring Order Level Fields
- Adding Purchase Order Lines
- Managing Receipts and References
- Saving and Processing the Order
Accessing the Creation Menu
To begin the creation process, you must navigate to the dedicated purchasing module:
 | Click on Purchase Orders under the Purchases menu in the left-hand navigation pane. |
 | Click the Create button in the upper right corner to deploy the empty configuration fields. |
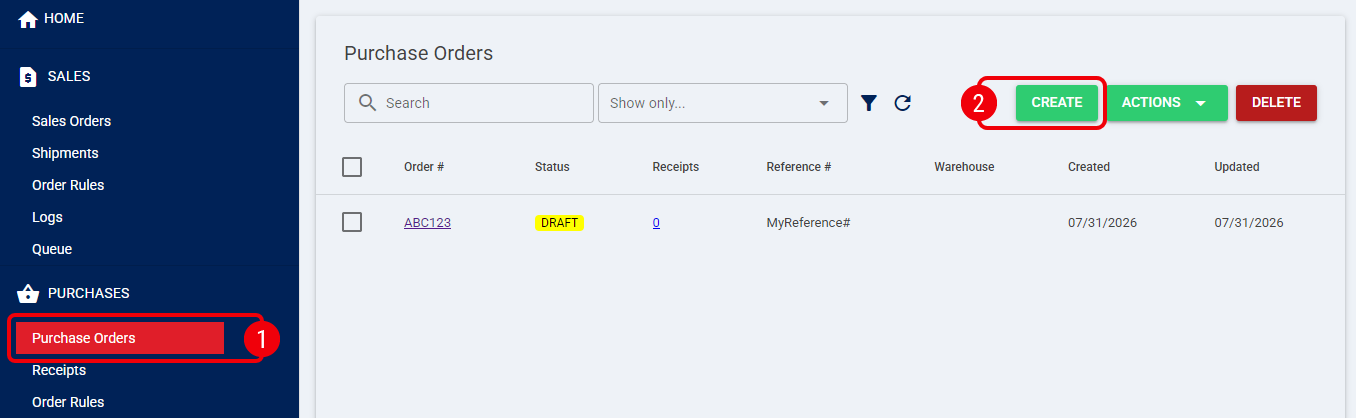
After you click Create, the new Purchase Order opens with empty configuration fields. Continue by completing the order level fields.
Configuring Order Level Fields
The top section of the screen dictates the high-level details and routing rules for the entire order.
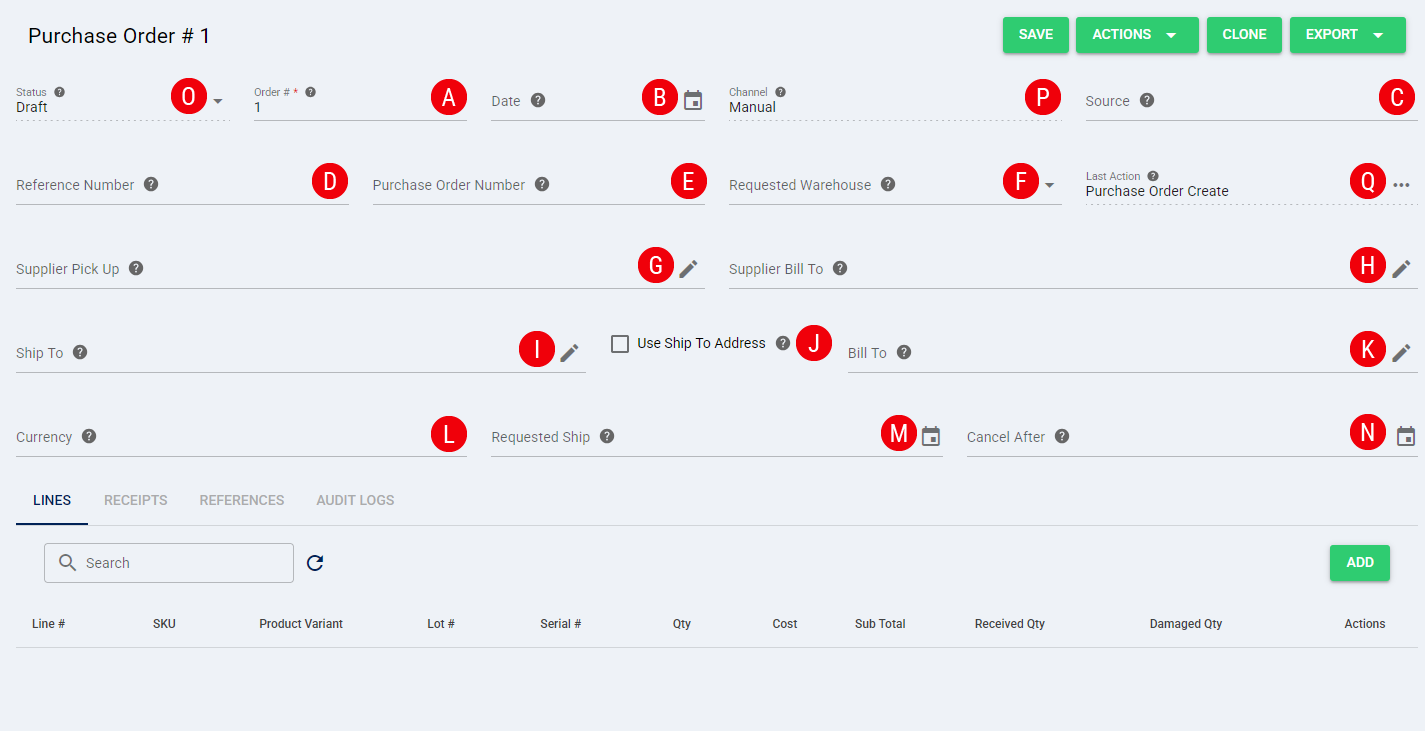
Editable Fields
Complete the following order level fields:
 | Order #: This is preassigned by the system upon creation, yet it is manually modifiable if you need to enforce a custom sequence. |
 | Date: The official date for the order creation. |
 | Source: A free-text field to document the origin or source of the Purchase Order. |
 | Reference Number: An internal or external reference code linked to this purchase. |
 | Purchase Order Number: The official document number provided to the supplier. |
 | Requested Warehouse: Use the drop-down menu to assign the order to a specific receiving Warehouse. When you select a warehouse, Ship To is immediately populated with that warehouse's address. |
 | Supplier Pick Up: Displays the selected Supplier's Pick Up address. Click the pencil icon to enter the address or select a saved Supplier. |
 | Supplier Bill To: Displays the selected Supplier's distinct Bill To address when you select a Supplier. |
 | Ship To: Displays the address of the Requested Warehouse selected for the Purchase Order. |
 | Use Ship To Address: Select this option to copy the Ship To information into Bill To. |
 | Bill To: Displays the billing address for the Purchase Order. Clear Use Ship To Address if you need to edit this address independently. |
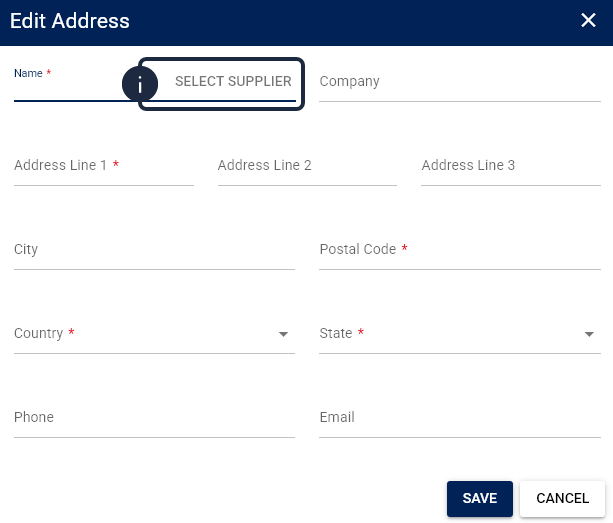
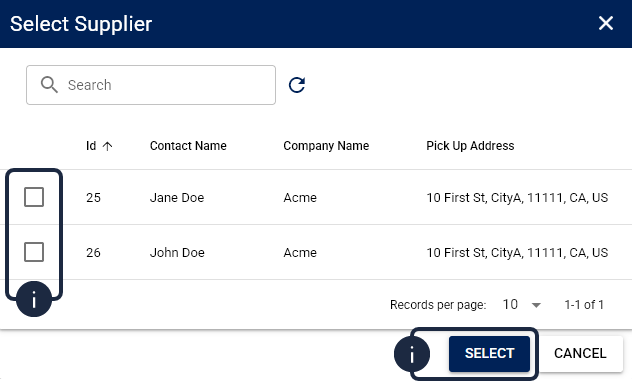
| To select a saved Supplier, click the pencil icon for Supplier Pick Up, and click Select Supplier in the Edit Address dialog.
Select the desired Supplier, and save the address.
techOMS populates Supplier Pick Up from the Supplier's Pick Up address and Supplier Bill To from its distinct Bill To address. The Use Ship To Address copies that information into Bill To. If you clear the option, you can edit Bill To independently. The selected Supplier and saved address values remain when you save and reopen the Purchase Order. For more information about saved Supplier records, refer to Understanding Customers and Suppliers (Address Books) [Guide]. | |
 | Currency: Select the monetary currency that applies to the costs and totals within this Purchase Order. |
 | Requested Ship: The requested ship date expected from the vendor. |
 | Cancel After: An optional expiration field that can be set to automatically cancel the order if the date limit is met. |
Read-Only Fields
The system automatically populates and tracks the following operational indicators:
 | Status: This is preassigned as Draft. It is automatically updated by the system as subsequent actions are performed. For detailed conceptual information and advanced configuration, refer to Sales and Purchase Order Statuses Definitions [Information]. |
 | Channel: Displays the specific channel or integration method (e.g., Manual, API) used to create the order. |
 | Last Action: Displays the most recent workflow action or event logged against the Purchase Order (e.g., Purchase Order Create). Click the three dots icon to access the last action details. |
Adding Purchase Order Lines
Once the header is complete, you must define the specific products being ordered, along with their tracking numbers and costs.
| Navigate to the Lines tab. |
| Click the Add button on the right side of the grid to open the line item dialog. |
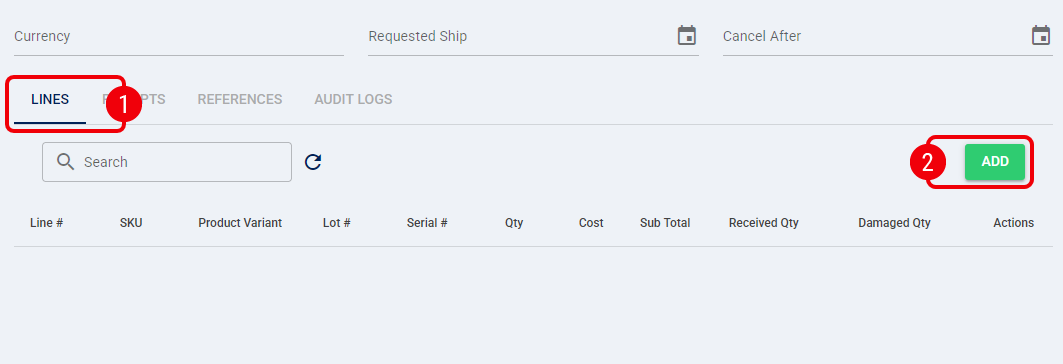
 | Complete the following fields for each product line and click Save: |
- Line #: Enter the specific line sequence number.
- SKU: This is a read-only field that automatically populates with the SKU Code once a Product Variant is selected.
- Product Variant: Begin typing the variant name or code to search, and select the correct variant value from the dynamic drop-down list.
- Lot #: Details the specific lot number for batch traceability purposes.
- Serial #: Details the unique serial number of the item (if applicable).
- Quantity: The total amount of physical units requested in this line.
- Cost: The individual unit cost of the item. This is an optional field; if left blank, it may default to the Retail Price configured at the variant level, depending on your system configuration.
| Each line supports only one Lot # and one Serial #. When a Serial # is assigned, the Quantity cannot exceed one. Therefore, if multiple units share the same serial format or require individual serialization, you must add a separate line for each unit. Keep in mind that lot and serial numbers are available for supported fulfillment channels, but specific limitations may apply. For more information on this tracking feature, refer to Understanding Lot and Serial Numbers Synchronization [Information]. For a complete breakdown of supported channels, refer to techOMS Fulfillment Channels - Master List [Guides List]. | |

As you save and accumulate lines, the main Lines grid will automatically calculate and display the total line value. The Sub Total read-only grid column calculates the extended subtotal in real-time by multiplying the line Quantity by the unit Cost.
Managing Receipts and References
In addition to line items, you can use the adjacent Receipts and References tabs to provide further documentation:
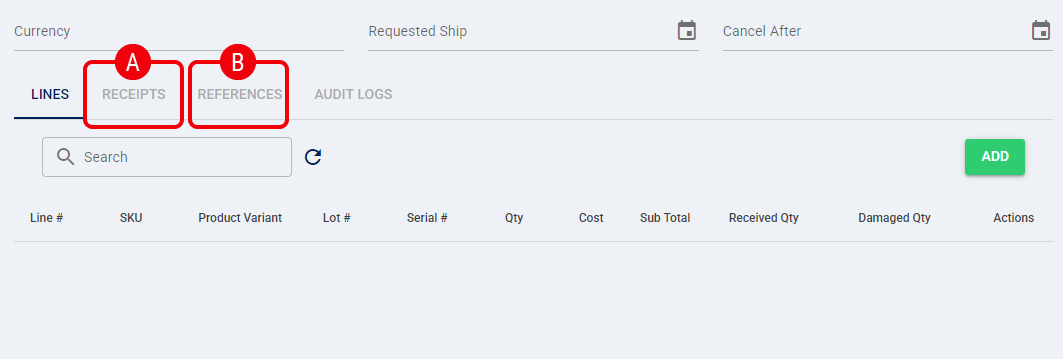
 | Receipts: View or manage associated inbound receiving logs for the order. |
 | References: Add customized reference tags to classify the document. For detailed conceptual information and advanced configuration, refer to How to Manage References for Sales and Purchase Orders: Create, Edit, Delete, and Filter [Step-by-Step Guide]. |
Saving and Processing the Order
Once all lines and costs are accurately entered, you must save your progress to lock the data into the system.
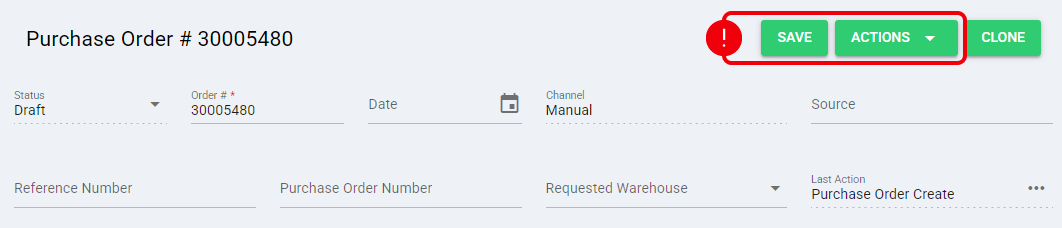
Choose the mode applicable to your current workflow:
- Save: Saves the Purchase Order in Draft mode, allowing you to return and make further edits later.
- Actions: Opens a drop-down menu to move the order forward through the process pipeline.
- Approve: Formally approves the order, readying it for the warehouse or integration.
- Run Workflow: Executes the automated vendor workflow exactly as configured under your specific routing rules.
- Cancel: Instantly cancels the approved order, halting all further processing.
You have now successfully created and saved the Purchase Order with accurate line-level cost visibility and the required supplier and address information. When you are ready to continue processing it, use Actions according to your workflow.
Was this article helpful?
That’s Great!
Thank you for your feedback
Sorry! We couldn't be helpful
Thank you for your feedback
Feedback sent
We appreciate your effort and will try to fix the article