Managing numerous predefined boxes across multiple client profiles in techSHIP can be time-consuming if done manually. This bulk export and import feature allows you to download your entire packaging inventory for a client into a spreadsheet, make rapid edits, and upload it back into the system to streamline your cartonization workflow.
This guide covers how to export your existing box definitions, format your data correctly, and import your updated packaging profiles.
TABLE OF CONTENTS
- Understanding Bulk Box Operations
- Accessing the Boxes Tab
- Exporting Box Definitions
- Importing Box Definitions
Understanding Bulk Box Operations
The bulk export and import functionality operates at the individual client level, ensuring that each client profile maintains its unique packaging requirements.
When you use the Export function, the system generates an XLSX file formatted with fifteen specific columns. This exact file acts as your template for the Import process, meaning you do not need to download a separate template file.
 | If you export boxes from a client profile that currently has zero boxes configured, the system will still generate the ClientBoxes.xlsx file containing only the header row, giving you a perfect blank template to start building your inventory. | |
| | ||
When importing, the system matches your spreadsheet rows to your existing boxes using the Name column (case-insensitive). Your data will be validated per row, meaning that valid rows will successfully import even if other rows contain errors.
 | This process handles box definitions only. SKU lists assigned to specific boxes are deliberately excluded from the export file. Furthermore, importing a file will not restore or modify any existing SKU assignments. | |
| | ||
For detailed conceptual information and advanced configuration regarding tags, refer to How to Manage Box Tags [Step-by-Step Guide].
Accessing the Boxes Tab
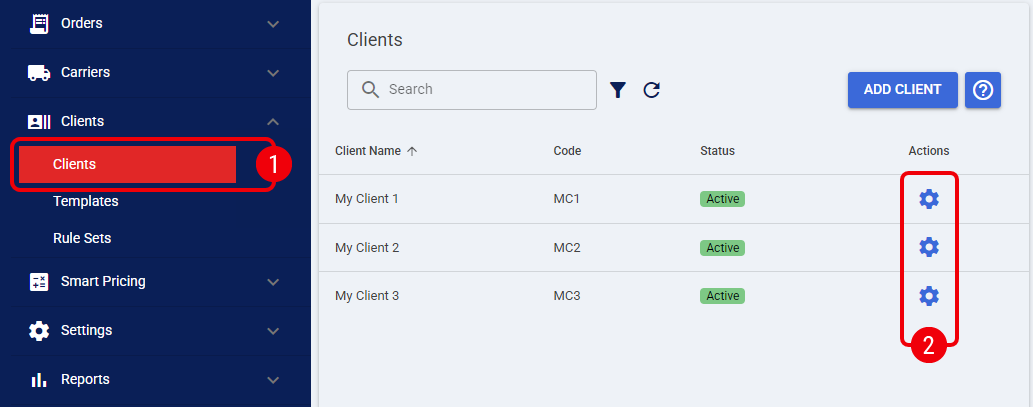
To begin managing your predefined packaging, you must first navigate to the correct client configuration area.
 | Click Clients from the main left navigation menu in techSHIP. |
 | Click the Settings gear icon next to the desired client profile. |
 | Click the Boxes tab to view the client's current packaging inventory. |
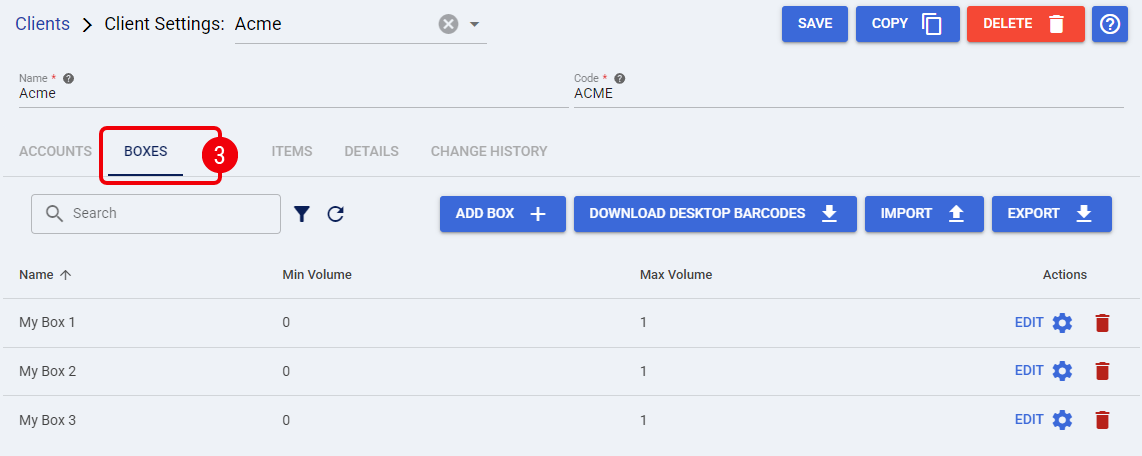
You are now in the correct location to manage, export, or import your boxes.
Exporting Box Definitions
Downloading your existing packaging setup allows you to quickly audit your inventory or prepare a spreadsheet for bulk edits.
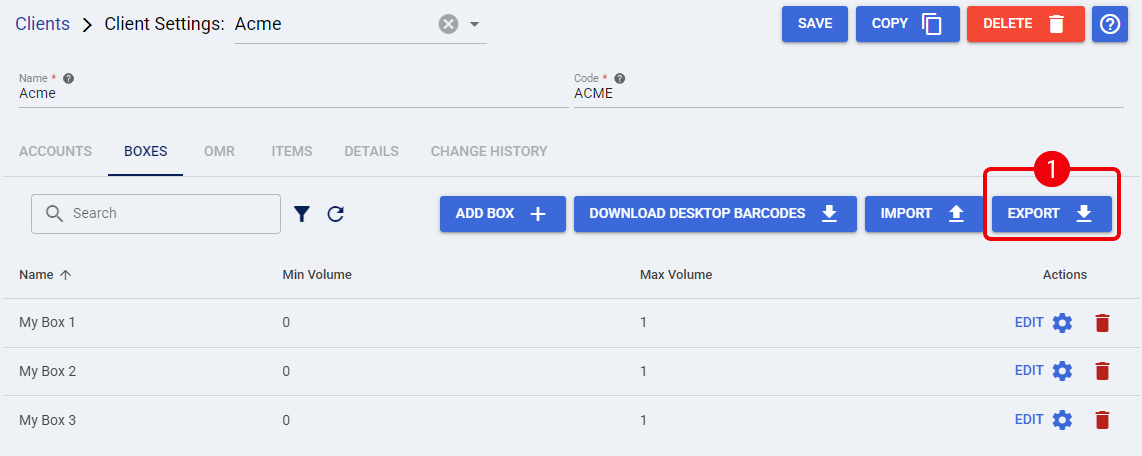
| From the Boxes tab, click the Export button located at the top right of the grid. |
| Click OK to confirm the warning dialog that appears, which reminds you that SKU lists are not included and that renaming a box in the spreadsheet will create a completely new box instead of updating the old one. |
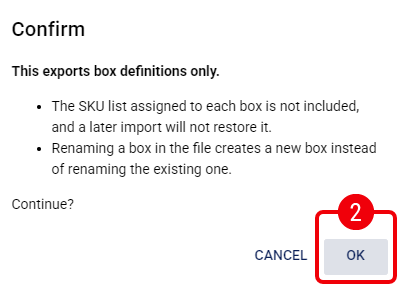
Your box definitions are now successfully exported and ready to be opened in your preferred spreadsheet editor.
Importing Box Definitions
Once you have populated or modified your ClientBoxes.xlsx file, you can upload it to rapidly update your client's configuration.
| From the Boxes tab, click the Import button. |
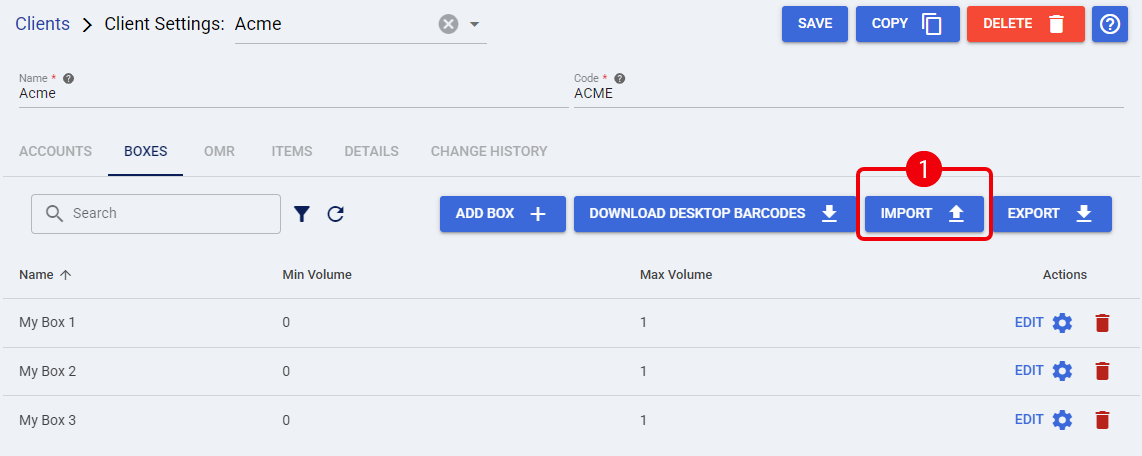
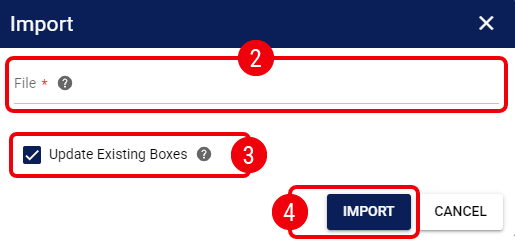
| Click the File upload area in the modal and select your prepared XLSX document. |
| Decide how you want to handle existing records by toggling the Update Existing Boxes checkbox: |
- Keep it Checked (Default) to update any existing boxes that match the Name in your spreadsheet with the new dimensions and weights.
- Leave it Unchecked to skip any rows that match an existing box Name, effectively only importing entirely new boxes.
 | Click the Import button to process the file. |
Review the result summary toast message, which will display the number of boxes imported, updated, skipped, and any row-level errors encountered.
| If you omit an optional column entirely from your spreadsheet, the existing value in techSHIP will remain untouched. However, if you include an optional column but leave the cell blank, the system will clear that existing value during an update. | |
| | ||
The predefined boxes are now successfully uploaded into your client profile and immediately available for cartonization routing.
Was this article helpful?
That’s Great!
Thank you for your feedback
Sorry! We couldn't be helpful
Thank you for your feedback
Feedback sent
We appreciate your effort and will try to fix the article