![Article 1: UPS (REST) Onboarding Requirements and Configuration Guides [Information]](https://s3.amazonaws.com/cdn.freshdesk.com/data/helpdesk/attachments/production/96804813/original/7GJKyJXA3AM8E5itsPpDRjtqBPX6owOtKQ.png?1779474489) | ![Article 2: Reference Data: UPS (REST) Baseline Account Fields [Guide]](https://s3.amazonaws.com/cdn.freshdesk.com/data/helpdesk/attachments/production/96805389/original/PESWYE3uLdtYfrTR6D8pmzemRjxuhc873g.png?1779476661) | ![Article 3: Reference Data: UPS (REST) Client (Billing) Account Fields [Guide]](https://s3.amazonaws.com/cdn.freshdesk.com/data/helpdesk/attachments/production/96804742/original/bHFYZzIg1p3n6eidaRLAM0zP1uVKzHY4sw.png?1779473999) |
| Onboarding and Configuration | Baseline Account | (Billing) Account |
 You are here You are here |
This reference lists the carrier-specific UPS (REST) Baseline Account fields used in techSHIP configuration.
Use it together with the linked Baseline Account setup steps: the setup guide covers the shared configuration flow, while this article defines the confirmed field values, field behavior, and carrier-specific configuration details.
 |
For a complete overview of supported carriers and related setup guides, refer to techSHIP supported Carriers - Master List [Guides List].
|
 | Review UPS (REST) Onboarding Requirements and Configuration Guides [Information] before configuring the Baseline Account so required credentials and account settings are confirmed. |
TABLE OF CONTENTS
Adding a Baseline Account
Follow the UI Navigation steps in How to Add a Carrier Baseline Account [Step-by-Step guide], using the carrier-specific values provided in this guide.
Go to  | |
 |  |
| Essential Configuration | Carrier-Specific This article |
Carrier-Specific Instructions
| Return to | |
 |  |
| Essential Configuration | Carrier-Specific |
Carrier Tab
The Carrier tab contains the Baseline Account fields used to identify the UPS connection and define confirmed carrier-specific behavior. Field order follows the current UPS (REST) UI.
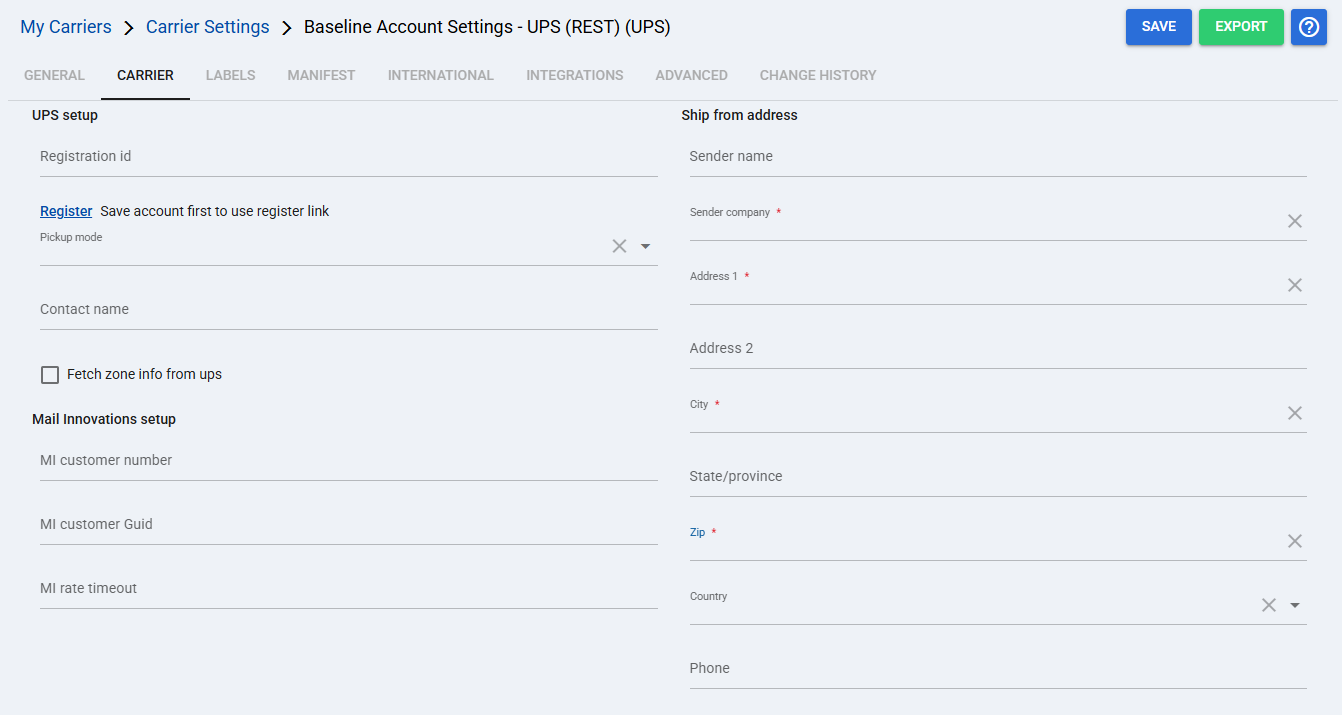
 | Registration id: Contains the UPS registration information associated with the carrier connection. The registration process completes the UPS authorization and applies the resulting connection information to the Baseline Account. Register: Save the account first, then use this link to start the UPS registration process. |
 | Pickup mode: Select how the UPS pickup process should be handled, such as Manual, Regular, Dropoff, or another available option applicable to the account. |
 | Contact name: Enter the warehouse contact information used for the UPS account. |
 | Fetch zone info from ups: Sends an additional rate request to UPS to obtain the carrier zone. |
 | MI customer number: Enter the UPS Mail Innovations customer number used when Mail Innovations rates are required. This information is provided for the UPS Mail Innovations account. |
 | MI customer Guid: Enter the UPS Mail Innovations customer GUID used when Mail Innovations rates are required. |
 | MI rate timeout: Specifies the rate timeout used for UPS Mail Innovations rating. |
 | Ship from address: Configure the warehouse induction address used by the UPS carrier account. Sender name: Sender name associated with the induction address. Sender company: Sender company associated with the induction address. Address 1: Primary street address. Address 2: Additional address information, when applicable. City: City for the induction address. State/province: State or province, when applicable. Zip: ZIP/postal code for the induction address. Country: Country for the induction address. Phone: Phone number associated with the ship-from address. |
| If you are Rate Shopping UPS Mail Innovations, additional Mail Innovations controls must also be configured on the Client (Billing) Account. |
Labels Tab
Set Mode to ZPL, as confirmed by the legacy UPS Baseline Account configuration.
| Click Save before continuing so the configured settings are applied. |
Finalizing the Setup
Once the Baseline Account has been created, registered, validated, and saved, continue with Reference Data: UPS (REST) Client (Billing) Account Fields [Guide].
Was this article helpful?
That’s Great!
Thank you for your feedback
Sorry! We couldn't be helpful
Thank you for your feedback
Feedback sent
We appreciate your effort and will try to fix the article