To connect Camelot, first create a Fulfillment Channel connection, and then set up its parameters.
Once the connection is established between the channel and techOMS, you can use all its supported features as listed in the techOMS Fulfillment Channels - Master List [Guides List].
 WARNING: This article details the steps to connect using the beta version of this fulfillment channel. The stable version can be edited, but new instances can no longer be created, and its options may differ from those listed here.
This is a two-phase procedure:
- Create the Fulfillment Channel
- Configure Additional Parameters
 NOTE: Make sure that you are operating at the right Vendor/Warehouse beforehand.
I. CREATE THE FULFILLMENT CHANNEL
To create a Fulfillment Channel, follow the instructions in How to set up Warehouses and Fulfillment Channels for an Account [Step-by-step guide].
Once added, proceed to the following section.
II. CONFIGURE ADDITIONAL PARAMETERS
1. Click Channels from the left menu under the Fulfillment Channels section.
2. Click on the created channel's name in the list.

3. Configure its parameters according to each section as required and press Save.
SECTIONS
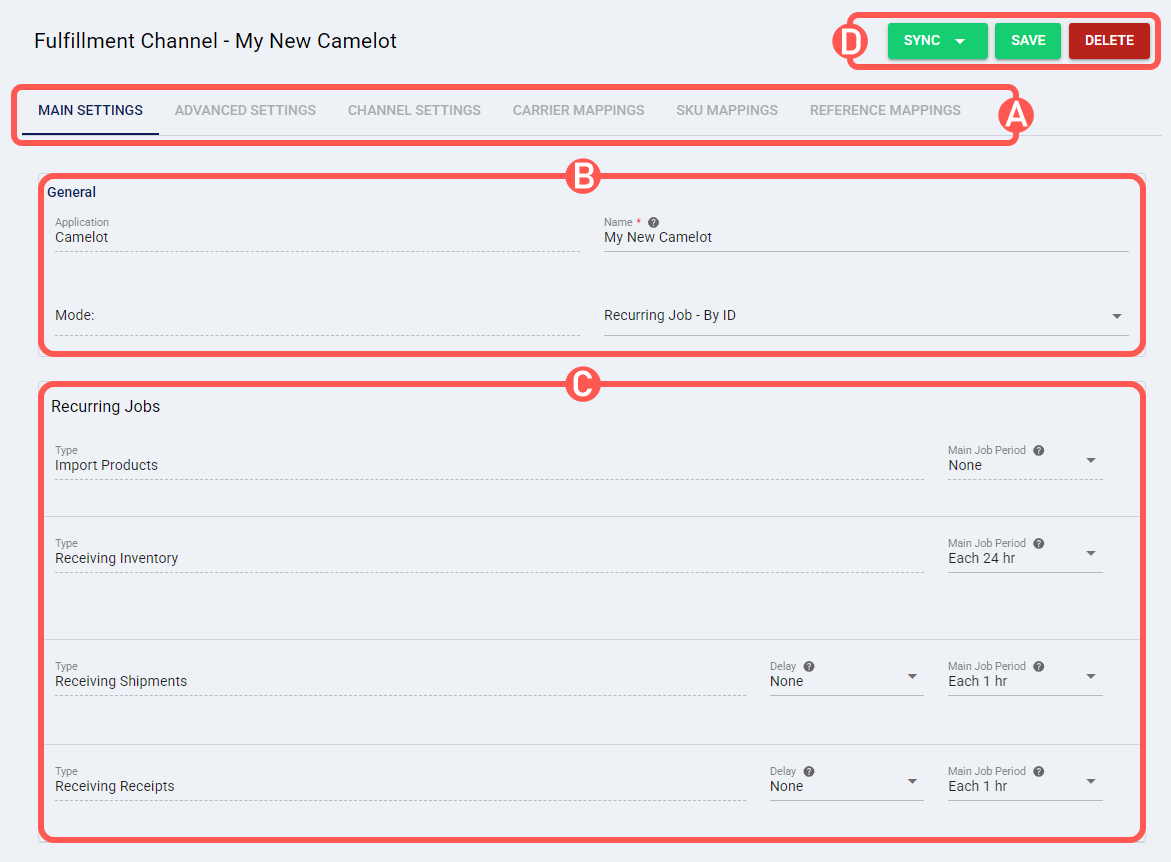
A) VIEW SELECTION allows changing the different view modes:
- Main Settings (default): Allows configuring general settings.
- Advanced Settings: Allows to define channel advanced settings as detailed in How to manage Fulfillment Channels Advanced settings [Step-by-Step guide].
 WARNING: Make sure that the text entered in the reference fields (Shipment Reference Number Template and Receipt Reference Number Template) is in uppercase. Lowercase characters may lead to integration issues.
 - Channel Settings: Allows managing the channel connection settings:
- URL Address: Camelot URL Address endpoint.
- Username & Password: Camelot username and password.
- Client Name: Camelot Client name ID.
- Trading Partner: Camelot Trading partner ID.
- Pull inventory profile: Profile value for pulling inventory, matching the definition in Camelot.
- Push/Pull shipments profile: Profile value for pushing/pulling shipments, matching their definition in Camelot.
- Push/Pull receipts profile: Profile value for pushing/pulling receipts, matching the definition in Camelot.WARNING: To ensure existing profiles connect successfully, all Camelot profile fields (Pull inventory, Push/Pull shipment, and Push/Pull receipts) must be filled in. Enter dummy values (10 characters or fewer) for any fields you are not configured to use, then click Save.
- Date Format: Allows you to change the format of the order date.
 NOTE: Some older versions of Camelot may only support specific date formats. Use this field to address such cases.
 - Throughput: Controls the number of API calls per second sent to Camelot during fulfillment processing. This limit helps prevent database deadlocks on the Camelot side. The default value is 1 and can be adjusted by the customer.
NOTE: The "Bill-to address" is transmitted to Camelot via API using the BillTo segment isntead of FreightBillTo. This is not visible in Camelot user interface.
- Carrier Mappings: Allows reviewing and setting carrier name mappings between the channel and techOMS as detailed in How to map Carriers in a Fulfillment Channel [Step-by-step guide].
- SKU Mappings: Allows reviewing and setting SKU mappings between the channel and techOMS as detailed in How to map SKUs in a Fulfillment Channel [Step-by-step guide].
- Reference Mappings: Allows reviewing and setting the one-way mapping of references from techOMS to the channel. Refer to How to map References in a Fulfillment Channel [Step-by-step guide] for more details.
B) GENERAL displays and/or allows editing the connection name and the Automation Mode as detailed in How to configure Automations for Sales/Fulfillment channels [Step-by-step guide]
C) AUTOMATION SETTINGS allows configuring available automations (such as recurring jobs). For more information, refer to How to configure Automated Recurring Jobs for Sales/Fulfillment channels [Step-by-step guide].
D) QUICK ACTIONS allows performing additional/quick actions:
- Sync: Manually synchronize elements between systems to either
- Import Products From ChannelNOTE: The Import option is available only when the channel is set as the Master Product Source; for more details, see Understanding the techOMS Master Product Source [Information]. Make sure the Camelot Inventory Profile is added under the Channel Settings tab.
- Receive Inventory Level From Channel
- Receive Shipments From Channel
- Receive Receipts From Channel
- Import Products From Channel
- Save: Save changes.
- Delete: Delete the channel connection.
Was this article helpful?
That’s Great!
Thank you for your feedback
Sorry! We couldn't be helpful
Thank you for your feedback
Feedback sent
We appreciate your effort and will try to fix the article